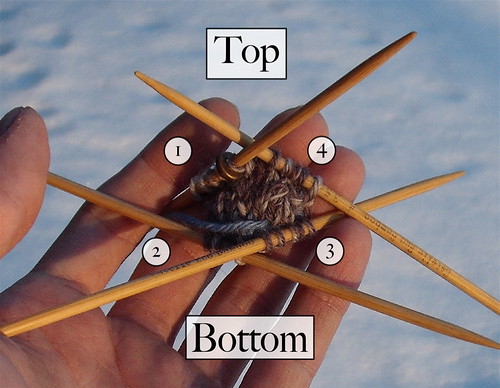
Well, I've ripped these things three times. One because I realised that I wanted to do the toe in heel stitch. Two because circular heel stitch while increasing is harder than I thought.
So, in the interests of not ripping a fourth time, I'm going to write out one full repeat of the heel stitch-while-increasing pattern.
It uses the needle numbering I've used elsewhere, where the two needles on top are 1 and 4, and the ones on the bottom are 2 and 3.

Heel Stitch Toe
First, knit four rows from a provisional cast on of 8 stitches and divide the 16 stitches between four needles. You'll be on needle 4, so knit that needle to get to needle 1.
- Knit the entire round.
- Needle 1: k2, kfb, k1 (5)
Needle 2: k1, kfb, k2 (5)
Needle 3: k2, kfb, k1 (5)
Needle 4: k1, kfb, k2 (5) - Needle 1: k1, s1 wyib, k3
Needle 2: k3, s1 wyib,, k1
Needle 3: s1 wyib, k1, s1 wyib, k2
Needle 4: k2, s1 wyib, k1, s1 wyib - Needle 1: k3, kfb, k1 (6)
Needle 2: k1, kfb, k3 (6)
Needle 3: k5
Needle 4: k5 - Needle 1: k1, s1 wyib, k1, s1 wyib, k2
Needle 2: k2, s1 wyib, k1, s1 wyib, k1
Needle 3: s1 wyib, k1, s1 wyib, k2
Needle 4: k2, s1 wyib, k1, s1 wyib - Needle 1: k4, kfb, k1 (7)
Needle 2: k1, kfb, k4 (7)
Needle 3: k3, kfb, k1 (6)
Needle 4: k1, kfb, k3 (6) - Needle 1: k1, s1 wyib, k1, s1 wyib, k3
Needle 2: k3, s1 wyib, k1, s1 wyib, k1
Needle 3: s1 wyib, k1, s1 wyib, k3
Needle 4: k3, s1 wyib, k1, s1 wyib - Needle 1: k5, kfb, k1 (8)
Needle 2: k1, kfb, k5 (8)
Needle 3: k6
Needle 4: k6 - Needle 1: k1, s1 wyib, k1, s1 wyib, k1, s1 wyib, k2
Needle 2: k2, s1 wyib, k1, s1 wyib, k1, s1 wyib, k1
Needle 3: s1 wyib, k1, s1 wyib, k3
Needle 4: k3, s1 wyib, k1, s1 wyib
The rules are:
- Knit on increase rows.
- Needle 1 starts on a knit stitch.
- The last two stitches on the needle are never slipped, otherwise you get holes.
- Needle 2 is needle 1 knit backwards (ends on a knit stitch).
- Needle 3 starts on a slip stitch.
- Needle 4 is needle 3 knit backwards (ends on a slip stitch).
I think, when I write this pattern out in full, that I'll write it from 4 stitches on each needle through to 60 stitches around, simply because it's not a pattern that follows easily.
ETA (7/2/2009): I've considered and toyed with this pattern more since noting it down, and the correct answer is that I'm numbering the needles wrong. Realistically, 1 and 2 should be the top of the foot, 3 and 4 the bottom.

I worked that out when trying to chart the pattern and not wanting to either write a chart with directions like "start at the middle, read right to left for needle 1, read left to right for needle 2 and 3, then right http://www.blogger.com/img/blank.gifto left for needle 4, stopping at the middle" or to write a separate pattern for each needle.
By changing how I thought of the needles, I was able to write a single chart for the top and the bottom, presented as two charts, as the bottom is the enantiomer of the top.

Deliberately, this chart goes on past what I reasonably expect as sizes, just to avoid having to try to give the extrapolation of the pattern as a process, as the algorithm for generating the toe relies somewhat on anticipating the next line.
No comments:
Post a Comment