|
|
|
In a little more thinking aloud, I charted the stitch patterns that I'm currently thinking about. The sensible next step would be to swatch them, but I'm going to be daft and simply lifeline my socks in another few pattern repeats and use them as the swatch.
Because I'm thinking about these patterns for socks, they're all given as circular directions, rather than flat.
Seed Rib

The half above the black line is the normal pattern repeat. The part below is the general pattern for the gusset decreases.
Stitches with a green background are repeated.
Mistake Stitch Rib

This pattern uses a multiple of 4 stitches plus 3. The stritches in green are repeated.
Embedded Moss Stitch Rib

The six stitches of this pattern are repeated throughout.
ETA (08/02/2009): Updated with better chart images.
ETA (12/02/2009): Changed the Seed Rib pattern, because the pattern of decreases in the seed rows was near-impossible to explain.
So, these socks take three, possibly four stitch patterns: heel stitch, shadow check, a stitch whose name I can't find, but will call seed rib and a pattern for the ribbing along the calf.
Shadow check and heel stitch are described in my original post about the shadow check socks. The unnamed stitch, which I shall, in future, call seed rib, is two rows garter, one row seed, two rows garter and one row seed (in the opposite pattern to the previous seed row).
My first humbling lesson was that heel stitch is incredibly difficult in the round. I've played with that some more, and in my working pattern, have managed to simplify the pattern for the toe dramatically.
My second was that shadow check draws the fabric far too tight to have any stockingette in the same row with it. That realisation led directly to my changing the seed rib from a part of the top to an all-over pattern, continuing it along the heel gusset. The decision to include it over the gusset created its own problems, though.
When decreasing for the gusset, to keep the pattern shrinking at an appropriate rate, there need to be decreases every round. The problem with that is that every third row is seed, and the decreases need to happen in pattern. Approaching the decreases, there are two possible patterns: k1, p1, k1, (marker) p1, k1 or p1, k1, p1, (marker) k1, p1. As you can see, either one of those patterns means that a 2-stitch decrease will double up a stitch. Taking the first as an example, if you k2tog, you end up with k1, k2tog, (marker) p1, k1 and if you p2tog, you have the opposite problem: k1, p2tog, (marker) p1, k1.
After several rounds of deliberation, I came up with the following pattern for decreasing the gusset in seed rows:
- Knit in pattern to two stitches before marker.
- If the last stitch was knit, k2tog. If it was purled, p2tog.
- Knit in pattern to the second marker.
- If the last stitch was knit, s1, p1, psso. If it was purled, ssk.
- Knit in pattern to the end of the round.
This ensures that the paired stitches match up nicely. Its biggest advantage, though, is that it stops what I was doing before, namely looking at the previous seed row and guessing based on that.
I still haven't decided what to do for the ribbing around the calf, though. Conceivably, I could knit the lot in seed rib, but I think I'd feel that I was ducking out. I expect and anticipate that I'll end up increasing to a multiple of five stitches and relying on that lovely standby, slip-stitch rib.
On the other hand Barbara Walker has two patterns that intrigue me. One is mistake-stitch ribbing, which looks interesting from the photos, but would have to be rather altered to work as a circular pattern. What it is is k2, p2 rib, worked on one stitch less than the needed multiple of 4 stitches, so that there is a column of knit surrounded by jagged knit and purl stitches.
The other is embedded moss stitch ribbing. That stitch pattern actually fits, interestingly, with seed rib. What it is is a pair of knit stitches enclosing two moss stitches. Converting that would be easy and looks like it'll fit with the overall texture.
So I spent two days playing with blogger, poking at layouts and widgets, all the while glancing over at the toe of the sock with no small amount of frustration. The sock was giving me a slight case of knitter's block, not helped by my ballpark calculation that I needed 600 stitches for each centimetre of sock.
Calling them Simple Textured Socks had passed from misnomer to outright lie. The pattern may be 5 stitches and six rows, but it requires enough attentiveness that I was unable to knit it while reading (my habit for stockingette and cables).
I finally put on a TV show, buckled down and started knitting, and was quite pleased to find that the interesting nature of the textures was carrying me along. As I knitted, I was intensely curious to see how the two patterns would grow.
I'm not sure whether to call this sock pattern beautiful or ugly. "Idiosyncratic" certainly describes it. The soles are dense but soft, about three times as thick as knit stitch. Even when flattened, the fact that the sock is so very dense and thick means that it's rounded rather than sitting flat.
The uppers are about half the thickness of the soles, but have an amazing amount of stretch to them. Horizontally, they can stretch to double their width and vertically to half again their size.
As well, and thankfully, the upper part of the sock gathers tightly in the vertical direction. Since the soles take 6 rows to get the same amount of length as two rows of knit stitch, they are incredibly tight in the vertical sense. Horizontally, they have the same density as heel stitch, something that I noted with my test swatch, and am using to my advantage.
For these socks, I've been adopting my usual modus operandi, namely knitting enough of the pattern that I have a clear picture of how it should look, then typing out an actual pattern and following it, amending mistakes and missteps as I go.
To date, there have been three changes to my pattern as written:
- I initially said that some stitches along the sides of the socks should be knit in stockingette, rather than working them in pattern. I was wrong about that; it resulted in two columns of stitches that were trying to grow vertically at a rate three times that of the rest of the sock, resulting in unfortunate bulges.
- Because I was following my Simple Toe-Up Socks pattern, I indicated several rounds of decreases between the ball of the foot and the instep. As it turns out, knitting a dense and stretch material neatly removes the need for that shaping, while making the socks' fit quite close.
- I had planned to knit the gussets and the calf in simple knit stitch, but it's becoming evident to me that changing the stitch that dramatically would look bad.
At the moment, I'm vacillating between four choices:
- Knit the gusset and the calf in garter stitch.
Simple, straightforward, but I worry that it'll be too plain.
- Knit the gusset in stockingette but knit all stitches that are not decreased as a part of the gusset in garter. This will eventually mean that the back garter stitches and the front garter stitches meet, making the calf a continuous band of garter stitch.
This adds some decoration to the previous pattern, but I'm afraid that what happened before with combining stockingette and a tighter stitch will recur, leaving the gusset to bulge outward.
- Knit the gusset and calf in the same pattern as the upper part of the sock, decreasing in pattern.
The only reason to not do this is that it continues the pattern of this sock requiring careful attentiveness. In all honesty, I should bite the bullet, suck it up and knit the pattern.
- Knit the upper and back of the sock in pattern, but the gusset in stockingette.
I'm nearly certain that this idea will fail due to bulgy, unsightly gussets.
What I'm actually going to do is run a lifeline through the stitches once I've picked up off the edges of the heel flap, as, fortunately, all four of my possibilities start with one round of knit stitch.
Upper pattern
|
|
|
This is the as-yet-unnamed stitch that I adopted in order to keep the fabric throughout the sock in similar tension. It comes out as two rows of garter, making a single garter ridge, followed by one row of seed.
If you look carefully, you can see that the stitch pattern in the seed rows alternates, making this a 6-row pattern.
I decided on this for the upper part of the socks in order to have a stitch that was elastic in both directions but gathered vertically. And by "decided", I mean that I guessed at a texture and happened to get one that's quite functional.
|


|
Shadow Check - Right Side
|
|
|
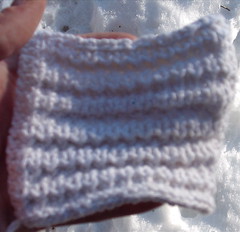
This shows the outer part of the soles. The right side of the shadow check pattern is a row of purl stitch, a stretched slip stitch sitting atop a purled background, followed by another row of slip stitch.
This pattern has next to no give in either direction, because the stitches that are slipped across five rows pull it very tight.
Below the shadow check pattern is the toe of the sock, showing how the raised (slipped) columns of heel stitch match up exactly with the slip stitches in the shadow check pattern.
|

|
Shadow Check - Wrong Side
|
|
|
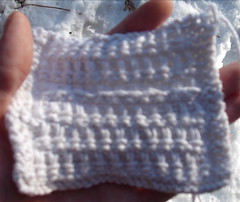
This is the wrong side of the shadow check pattern and why I picked it in the first place.
The first picture is deliberately taken with the lighting highlighting the incredible depth of the texture. The pattern makes the sole of the sock incredibly dense and soft.
|


|

I've made a little change to the instructions: In decreasing the ribbing, I said to p1, s1, psso. That's not really possible. I meant to say s1, p1, psso.
Also, I noticed that the pattern was written with my old method of typing stitches into a spreadsheet. Since then, I've set up Inkscape with a template SVG document that does a far far better job at giving me good-looking knitting patterns.
So, while updating the PDF for the dogwood cabled hat, I added in a proper graphical pattern, which looks far far prettier than the previous ASCII-art one.
Well, I've ripped these things three times. One because I realised that I wanted to do the toe in heel stitch. Two because circular heel stitch while increasing is harder than I thought.
So, in the interests of not ripping a fourth time, I'm going to write out one full repeat of the heel stitch-while-increasing pattern.
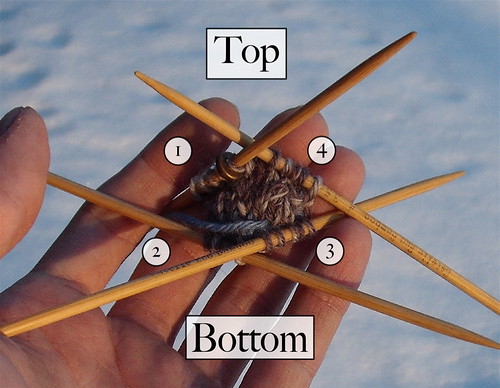
It uses the needle numbering I've used elsewhere, where the two needles on top are 1 and 4, and the ones on the bottom are 2 and 3.

Heel Stitch Toe
First, knit four rows from a provisional cast on of 8 stitches and divide the 16 stitches between four needles. You'll be on needle 4, so knit that needle to get to needle 1.
- Knit the entire round.
- Needle 1: k2, kfb, k1 (5)
Needle 2: k1, kfb, k2 (5)
Needle 3: k2, kfb, k1 (5)
Needle 4: k1, kfb, k2 (5)
- Needle 1: k1, s1 wyib, k3
Needle 2: k3, s1 wyib,, k1
Needle 3: s1 wyib, k1, s1 wyib, k2
Needle 4: k2, s1 wyib, k1, s1 wyib
- Needle 1: k3, kfb, k1 (6)
Needle 2: k1, kfb, k3 (6)
Needle 3: k5
Needle 4: k5
- Needle 1: k1, s1 wyib, k1, s1 wyib, k2
Needle 2: k2, s1 wyib, k1, s1 wyib, k1
Needle 3: s1 wyib, k1, s1 wyib, k2
Needle 4: k2, s1 wyib, k1, s1 wyib
- Needle 1: k4, kfb, k1 (7)
Needle 2: k1, kfb, k4 (7)
Needle 3: k3, kfb, k1 (6)
Needle 4: k1, kfb, k3 (6)
- Needle 1: k1, s1 wyib, k1, s1 wyib, k3
Needle 2: k3, s1 wyib, k1, s1 wyib, k1
Needle 3: s1 wyib, k1, s1 wyib, k3
Needle 4: k3, s1 wyib, k1, s1 wyib
- Needle 1: k5, kfb, k1 (8)
Needle 2: k1, kfb, k5 (8)
Needle 3: k6
Needle 4: k6
- Needle 1: k1, s1 wyib, k1, s1 wyib, k1, s1 wyib, k2
Needle 2: k2, s1 wyib, k1, s1 wyib, k1, s1 wyib, k1
Needle 3: s1 wyib, k1, s1 wyib, k3
Needle 4: k3, s1 wyib, k1, s1 wyib
The rules are:
- Knit on increase rows.
- Needle 1 starts on a knit stitch.
- The last two stitches on the needle are never slipped, otherwise you get holes.
- Needle 2 is needle 1 knit backwards (ends on a knit stitch).
- Needle 3 starts on a slip stitch.
- Needle 4 is needle 3 knit backwards (ends on a slip stitch).
I think, when I write this pattern out in full, that I'll write it from 4 stitches on each needle through to 60 stitches around, simply because it's not a pattern that follows easily.
ETA (7/2/2009): I've considered and toyed with this pattern more since noting it down, and the correct answer is that I'm numbering the needles wrong. Realistically, 1 and 2 should be the top of the foot, 3 and 4 the bottom.

I worked that out when trying to chart the pattern and not wanting to either write a chart with directions like "start at the middle, read right to left for needle 1, read left to right for needle 2 and 3, then right http://www.blogger.com/img/blank.gifto left for needle 4, stopping at the middle" or to write a separate pattern for each needle.
By changing how I thought of the needles, I was able to write a single chart for the top and the bottom, presented as two charts, as the bottom is the enantiomer of the top.

Deliberately, this chart goes on past what I reasonably expect as sizes, just to avoid having to try to give the extrapolation of the pattern as a process, as the algorithm for generating the toe relies somewhat on anticipating the next line.
This is meant as an alteration to my simple toe-up socks, but will en up with its own pattern when I'm done.
Since knitting them, I've been thinking about how to improve the pattern, and have realised that I'd like the soles thicker and softer. Barbara Walker has a stitch pattern called shadow check on page 103 of A Treasury of Knitting Patterns.

It's a lovely slip-stitch pattern, with a beautiful wrong side. The slipped stitches make it exceptionally dense, but the way it works makes it quite soft. Better still is that it can be worked over the same number of stitches as heel stitch.
However, there's a catch. As with all of her patterns, shadow check is given as a flat pattern with a right and a wrong side. Further, it doesn't easily translate to knitting in the round, at least, not easily enough that I can do it in my head, so I'm jotting down the stitch pattern, converted to circular knitting, so that I can refer to it when needed.
Shadow check (circular)
Odd number of stitches. Stitches in {braces} are repeated.
- {Purl 1}
- Purl 1, {knit 1, purl 1}
- Purl 1, {yarn over, slip 1 with yarn in back, purl 1}
- Purl 1, {drop the yarn over from the previous round, slip 1 with yarn in back, purl 1}
- Purl 1, {slip 1 with yarn in back, purl 1}
- Purl 1, {slip 1 with yarn in back, purl 1}

That pattern will make up the sole of the sock, with the right side facing out and the dense, corrugated wrong side facing in as padding. Because this will make the sole denser than simple knit stitch, I plan on having a small amount of ribbing on the top of the sock, to give the whole thing some give.
The heel of the sock will be made from standard heel stitch, which lines up exactly with shadow check and begins with a row of purl, which will serve nicely to complete the previous pattern.
Heel Stitch
Odd number of stitches. As this is worked flat, it has a right and a wrong side.
- (Wrong Side) {Purl 1}
- Knit 1, {slip 1 with yarn in back, knit 1}
Again, this is denser than simple knit stitch, but because the heel is knit flat and then gusseted, the only significant difference will be that there will be more decreases along the gusset.

Because slip-stitch patterns look really interesting when worked in multiple colours, rather than doing what I did before and knitting the toe, heel and cuff in self-striping yarn and the foot and ankle in plain, instead I'm going to use self-striping yarn for the whole thing.
Like everything, it's an experiment, but the only downside I see to this project is going to be that I can't work the sole while reading a book. Anyhow, time to cast this project on.

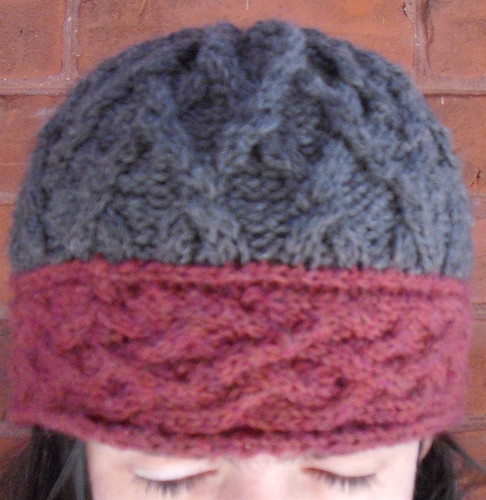
Well, after six attempts at the brim and two test-knits plus one failed attempt at the body, this hat came together.
It began as a simple concept: I wanted to make a hat that had a single braid pattern running around the brim. From that, form ollowed design. I knew that I'd have to graft the brim into a loop and pick up stitches.
That said, when starting, I noted grafting as something that I'd have to learn and had no clue what pattern I'd attach to the body of the hat. In the end, I failed at grafting but learned a lot and ended up knitting four patterns for the body before finding one that wasn't overwhelming.
The hat itself has the shift in density that I wanted, though. Around the ears, the fabric is thick, dense and warm. Atop the head, it flates out just slightly and sits loosely on my hair, hopefully preventing it from getting tangled and staticked by the hat.
Requirements
- 150-175 metres of worsted weight yarn, preferably in two colours.
- 4mm straight needles.
- 6mm circular needles and/or double-pointed needles.
- Circular or double-pointed needles in a size smaller than 4mm.
- A tapestry or sewing needle with an eye large enough to accommodate worsted weight yarn.
Instructions
Brim
Casting on
Cast on onto 4mm straight needles using a crocheted provisional cast-on of 22 stitches. Crochet a chain, placing the yarn behind a needle after every crochet stitch and pulling it through the loop on the hook such that it wraps around the needle. Chain a few more stitches and then pull the yarn through the loop. This gives a provisional cast-on that can be easily undone later on.
Knit the following pattern (brim chart):
- (wrong side) p2, k2, p6, k2, p6, k4
- (right side) p4, k4, c2l, c2r, k4, p2, k2
- p2, k2, p4, k1, p4, k1, p4, k4
- p4, c2x2l, p1, c2x2r, p1, c2x2r, p2, k2
- p2, k2, p4, k1, p4, k1, p4, k4
- p4, k4, c2r, c2l, k4, p2, k2
- p2, k2, p6, k2, p6, k4
- p4, k2, c2x2r, p2, c2x2l, k2, p2, k2
- p2, k2, p6, k2, p6, k4
- p4, k4, c2l, c2r, k4, p2, k2
- p2, k2, p4, k1, p4, k1, p4, k4
- p4, c2x2l, p1, c2x2l, p1, c2x2r, p2, k2
- p2, k2, p4, k1, p4, k1, p4, k4
- p4, k4, c2r, c2l, k4, p2, k2
- p2, k2, p6, k2, p6, k4
- p4, k2, c2x2r, p2, c2x2l, k2, p2, k2
Note here that the only difference between rows 1-8 and rows 9-16 is that on lines 4 and 12, the centre cable slants the opposite way.
Knit this pattern until, at the end of a set of 16 rows, the flat band that you are knitting is large enough to fit around the ears. Knit row 1 again. Cut the yarn, leaving a 1 metre long tail.
Grafting
Untie the knot at the end of your crochet chain and tug on the tail of yarn to undo it. As it releases stitches, pick them up on your free needle. The stitches may be slightly twisted here, so make sure before grafting that they are in the order specified by row 1 of the pattern.
Holding up the two needles, they should be facing the same way without twisting the brim. Turn them so that the brim forms a loop with the wrong side facing out.
You'll need to graft the stitches as they lie, using knit grafting (kg) for the knit stitches and purl grafting (pg) for the purls. Or, in other words, kg 4 times, pg 6 times, kg twice, pg 6 times, kg twice, pg twice.
Body
Picking up
Hold the looped brim so that the k2, p2 rib is at the top and the p4 stockingette is at the bottom. Pick up one stitch per row around the brim. Because the body is knit on larger needles, there is no need to adjust for gauge.
Knitting the body
Count the picked up stitches. If you didn't miss any rows, you should have a multiple of 16 stitches, plus one. Find the nearest multiple of 16. If it is greater than your number of stitches, you'll be increasing. If it is less than the current number of stitches, you'll need to decrease.
Mark the beginning of the round.
Using the 6 mm needles, knit one round in p2, k2 rib. If you need to increase, knit, evenly around the round, kfb, p2. If you need to decrease, knit k2tog, k1, p2 evenly spaced around the body of the hat.
Knit the following pattern:
- p2, k2, p2, k2, p2, k2, p2, k2
- p2, k2, p2, k2, p2, k2, p2, k2
- p2, c2l, c2r, p2, c2l, c2r
- p3, c2x2l, p4, c2x2r, p1
- p3, k4, p4, k4, p1
- p3, c2x2l, p4, c2x2r, p1
- p3, k4, p4, k4, p1
- p2, c2r, c2l, p2, c2r, c2l
- p2, k2, p2, k2, p2, k2, p2, k2
Do not knit the last two stitches of this round. Instead, move your round marker back two stitches. This is the new beginning of the round.
- c2l, c2r, p2, c2l, c2r, p2
- p1, c2x2r, p4, c2x2l, p3
- p1, k4, p4, k4, p3
- p1, c2x2r, p4, c2x2l, p3
- p1, k4, p4, k4, p3
These two rounds make a 4-stitch-wide twist in the columns of 4 knit stitches.
- c2r, c2l, p2, c2r, c2l, p2
Knit the first two stitches of the next round and move your round marker forward two stitches. This is the new beginning of the round.
- p2, k2, p2, k2, p2, k2, p2, k2
- p2, c2l, c2r, p2, c2l, c2r
- p3, c2x2l, p4, c2x2r, p1
- p3, k4, p4, k4, p1
- p3, c2x2l, p4, c2x2r, p1
Reducing
If you are knitting on circular needles, as you knit the following rounds, when the stitches become too tight, switch to double-pointed needles.
- p3, k2tog, k2, p4, k2, ssk, p1 (14 stitches per repeat)
- p2, s1, p1, psso, c2l, p2, c2r, p2tog (12 stitches/repeat)
- p2, s1, p1, psso, k2, p2, k2, p2tog (10 stitches/repeat)
- p3, c2l, c2r, p1
- s1, p1, psso, p2, c2x2r, p2tog (8 stitches/repeat)
- p3, k4, p1
- p3, c2x2r, p1
- p3, ssk, k2tog, p1 (6 stitches/repeat)
- s1, p1, psso, p1, k2tog, p1 (4 stitches/repeat)
- s1, p1, psso, p2tog (2 stitches/repeat)
Finishing
Cut the yarn and draw the tail through the stitches on your double-pointed needles. Pull it tight, knot it and weave it in.
The bottom of the brim is 4 rows of purl stitches and likely rolls in on itself. Taking a tapestry needle and yarn of the same colour as the brim, sew the selvedge to the uppermost row of purl stitches.
Chart
Brim

Body

Here's a nice simple hat pattern that popped into my head as I was re-knitting the knotwork hat.
Cast on enough stitches (a multiple of 4) on a circular needle to go loosely around the head. Join in the round and mark your starting point.
- Knit one round of k2, p2 rib.
- Cable two left (place two stitches on a cable needle, purl one stitch, knit two stitches off of the cable needle), purl one, repeat.
At the end of the round, move your starting point forward one stitch.
When the hat fits from ears to the top of the head, begin decreasing on the purl stitches. As before, after every cable row, move your round marker forward one stitch.
Essentially,ssk the last knit stitch of every fourth rib together with the following purl stitch. Cable the next round, then ssk on the cable before the decreased one, cable again.

The chart shows four cables; the parts in purple are repeats of the pattern. Rounds 1 and 2 should be repeated until the hat is tall enough, as described above.
These decreases should spiral around to the middle, where they meet.
After you're done decreasing, pass the yarn through the remaining stitches and pull tight.
By round 20 of the hat body, I'd made four mistakes. The biggest was that I'd cabled one of the twists left then right, but I'd also lost a stitch, realised that I wanted to alter the pattern at round 5, and didn't like how the knitted join between brim and body looked.
Solution: Rip 20, start over. I am, however, liking the feel of the second attempt more than the first, but this brings the false-start tally on this project to:
- 5 attempts at knitting a nice cable pattern for the brim.
- 2 test knits for the body pattern.
- 1 nearly-complete body ripped out.
This is a step that I first tried two months ago. I was pleasantly surprised that it was far less difficult than I was anticipating.
Preparation
You'll need the following:
- Needles smaller than the ones you intend to use, of the same type (straight, circular or double-pointed.)
- Knowledge of your vertical gauge (rows/cm) in the material from which you're picking up and your horizontal gauge (stitches/cm) with the yarn and needles that you'll be using to knit new material.
It is utterly vital that your gauge be over the same measurement. Further, this will be a lot easier if the number of stitches is a whole number. 3.5 rows / cm is much harder to work with than 7 rows / 2 cm.
Picking Up
For the sake of discussion, I'll presume that your stitches on the fabric from which you're picking up run left to right. That is to say that the material has been rotated ninety degrees clockwise. If it's turned the other way, reverse all lefts and right in the directions.
Looking at the fabric, the knit stitches should make "V"s, all pointing left. Directly above those should be your selvedge stitches. Between those, above the point of the "V", there is a hole in the fabric.
Insert one needle into this hole, then the other one beneath it. There should be two strands of yarn above the needles, as you're inserting the needles between two knit stitches. Knit one stitch.
Your new stitches should pull slightly to the right, making the hole through which you knit larger and more visible. Fortunately, as you pick up the other selvedge stitches, this becomes less visible.
Repeat this process with the next stitch, inserting the needle at the hole left of the knit "V" and knitting another stitch. This will give you one picked-up stitch per row.
Equalizing Sizes
There's a problem here, as you might guess from the gauge measurements. Namely, vertical gauge is different from horizontal gauge. There's two ways to solve that problem, one easy, the other giving more control over the fabric.
To cover the easy way first, simply knit the new material on needles where your horizontal gauge is the same as the vertical gauge on the fabric from which you're picking up. That is to say, if your vertical gauge is 5 rows / 2 cm, increase the needle size to ones where you have a horizontal gauge of 5 stitches / 2 cm.
Simple enough. The drawback is that, by necessity, the new fabric will be looser than the fabric from which you were picking up. If that doesn't bother you, carry on. If it does, read on.
To figure out how the fabric has to change requires a little math.
( stitches / cm ) / ( rows / cm ) == stitches / row
So, for example, if I have a horizontal gauge of 9 stitches / 2 cm and a vertical gauge of 7 rows / 2 cm, it works out as:
( 9 stitches / 2 cm ) / ( 7 rows / 2 cm ) == 9 / 7 stitches / row
The above is why I emphasized that the measurements need to be over the same distance. So long as your measurements are the same distance, the distances cancel out. It's also why the number of stitches need to be whole numbers: to avoid having fractions like 4.5 / 3.5. This is important because later on, these numbers are used for counting stitches, and 4.5 stitches is not a valid count.
If, on the other hand, I'm going from 24 rows / 5 cm to 8 stitches / 5 cm (small needles to larger ones), I get the calculation:
( 8 stitches / 5 cm ) / ( 24 rows / 5 cm ) == 8 / 24 stitches / row
Hopefully, it's evident that this part is simply creating a fraction with horizontal gauge over vertical gauge. There's nothing more to it if your measurement is the same.
If you want, reduce the fraction, so that both halves are as small as possible. This is only necessary for mathematical correctness (or ease of counting) though, so if you don't remember how or don't want to bother, leave it as it is.
Increasing
If the numerator (top part of the fraction) is greater than the denominator (bottom part of the fraction), that indicates that you need to increase the number of stitches to meet gauge.
Subtract the denominator from the numerator. The result is how many stitches you have to gain.
If I start with 9 / 7 stitches / row:
numerator - denominator == 9 - 7 == 2
So in that example, I need to gain 2 stitches over every 7. In other words, in every 7 stitches knit, I need two increases.
Decreasing
If the numerator (top part of the fraction) is less than the denominator (bottom part of the fraction), you'll need to decrease the number of stitches to meet gauge.
Subtract the numerator from the denominator. The result is how many stitches you need to lose. The result times 2 (because a decrease takes 2 stitches and makes them into 1 is how many stitches are required to make that many simple decreases.
If I start with 8 / 24 stitches / row:
denominator - numerator == 24 - 8 == 16
16 * 2 == 32
The result tells me that I need to lose 16 stitches, meaning that I need 32 stitches to decrease, or that I need to start rethinking needle sizes.
If I start with the more reasonable 7 / 9 stitches / row:
denominator - numerator == 9 - 7 == 2
2 * 2 == 4
This time, I need to lose two stitches every 9. That is to say, I need to decrease over 4 stitches, making them into 2. Because 4 is less than 9, this change in gauge is plausible.
Actually changing the number of stitches
The easiest way is to either knit or purl a row (depending on the rest of the pattern). Work all the increases or decreases on this row, which should sit close to the original fabric.
If you're working increases, do so with an eye to the bottom of the pattern, that way a stitch knit front and back can become two knit stitches on the next row.
In either case, it looks neater if the increases and decreases are spread out across the pattern, rather than being clustered together.
|
|