

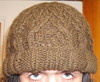


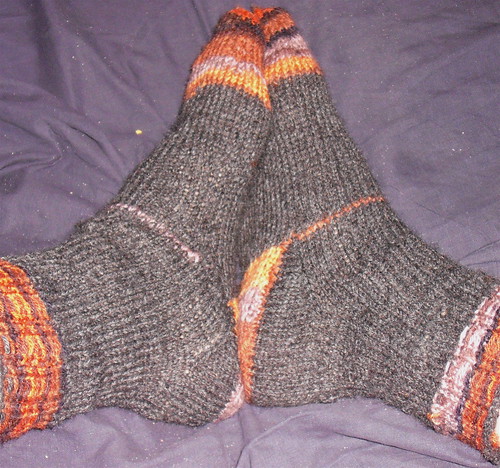
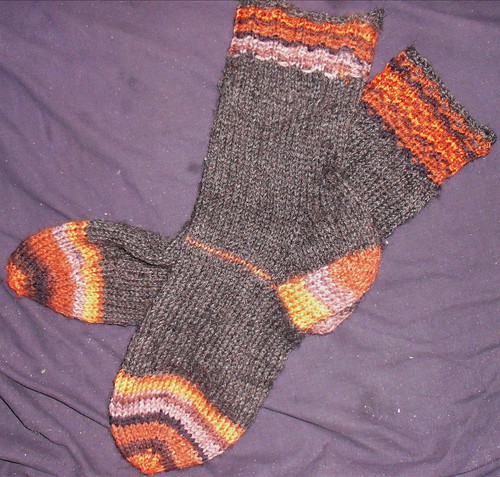
This is a pattern for toe-up socks. I amended several sock patterns and blended them together after finding that none of the patterns that I found on the internet fit my foot exactly.
These socks are fitted, so knowing your gauge with the needles and yarn that you'll be using is a must. As well, you'll need to know the length of the foot, the circumference around the ball of the foot, the circumference around the instep and the circumference around the ankle.
Casting on
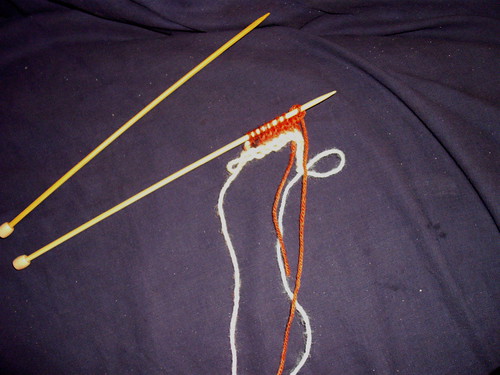
The sock starts with a provisional cast on. The way that I find easiest is to crochet a chain around a needle, that way it incorporates both the crochet chain and picking up the stitches into a single step. The toe is an adaptation of a pattern in Knitty.
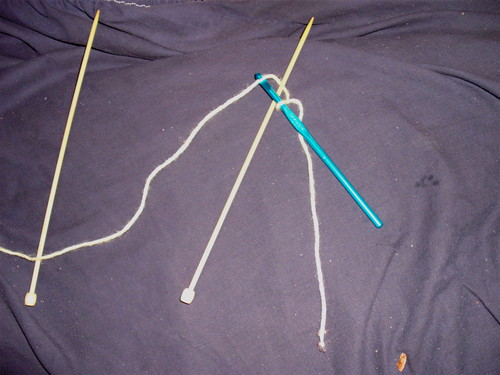
Using scrap yarn, start by tying a slip knot around a crochet hook. Then, wrapping the yarn behind a knitting needle, draw the yarn through the loop on the crochet hook, making a stitch.
You should have one loop on the crochet hook and one stitch below it, with the yarn wrapped around your knitting needle.
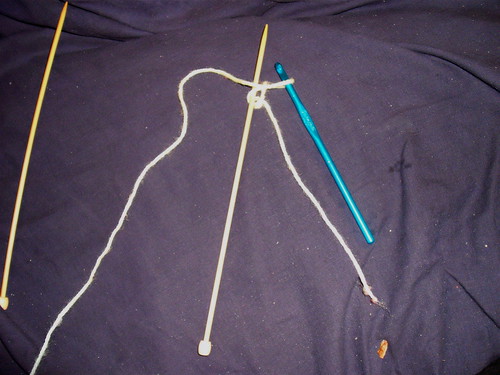
Repeat this process until you have at least eight stitches wrapped around the needle, then continue crocheting a chain without wrapping the yarn around the needle. This tail is useful to show what side you'll pull on to unzip the chain later on. (Video of crocheting a provisional cast on)
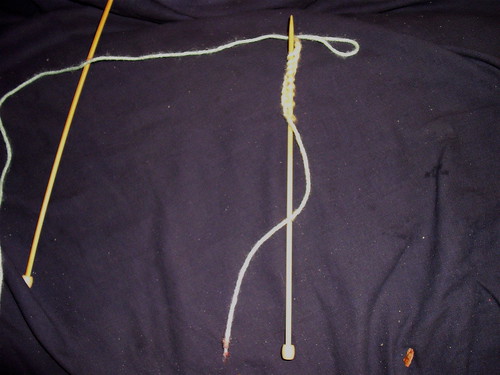
Next, with your working yarn, knit eight of the stitches on the needle, then continue working in stockingette until you have four rows, two knit and two purl.
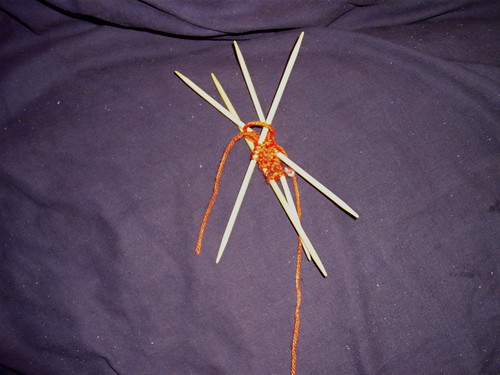
Separate the eight live stitches onto two double-pointed needles, then pull on the tail of the crochet chain to unfasten it, picking up the stitches of working yarn onto another two needles.
Knitting the toe
The first two needles are the top of the foot and the second two are the bottom. Knit the first four stitches, mark the second needle (it will be the start of the round, or needle 1) and continue knitting in the round until you're back to the first needle.
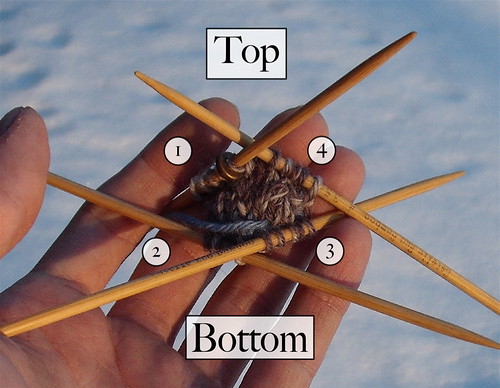
I like having the tip of the sock sit over my big toe, so I work the increases in a way that makes the toe lopsided. The pattern for this is:
Knit all but two stitches on needle 1, then knit the front and back (KFB) of the second-last stitch, inserting the right needle for a knit stitch, pulling a loop of yarn through, then inserting the right needle through the back loop of the same stitch, pulling a second loop of yarn through, then sliding the stitches off of the left needle.
Knit the last stitch on needle 1, the first stitch on needle 2, KFB the second stitch, then knit to the second-last stitch on needle 3. KFB that stitch, knit the last stitch on needle 3, the first stitch on needle 4, KFB the next stitch and knit to the end of the needle.
Next, knit a round normally. This loosens the stitches that you just made, while slowing the growth of the toe slightly.
For the third round, knit all the stitches on needles 1 and 2, knit to the second-last stitch of needle 3, KFB, knit the last stitch and the first on needle 4, KFB the second and knit to the end of needle 4.
The fourth round is another one of knit stitch. Note: The above pattern is for the left foot. For the right foot, the increases on the third row are on the second-last stitch of needle 1 and the second stitch of needle 2 instead.
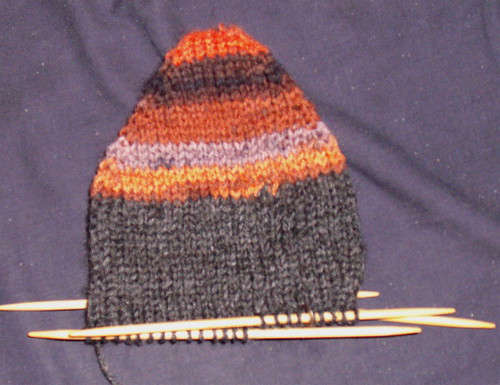
Work out how many stitches go around the ball of the foot by taking your measurement and multiplying it by your gauge. In my case, my gauge working in the round is 3 stitches / cm and the ball of my foot is 16 cm in circumference.
16 cm * 3 stitches / cm == 48 stitches
Knit the above four rounds until your toe has grown to the size measured around the instep, rounded to the nearest even number of stitches. If the yarn is stretchy, round down, if not, round up.
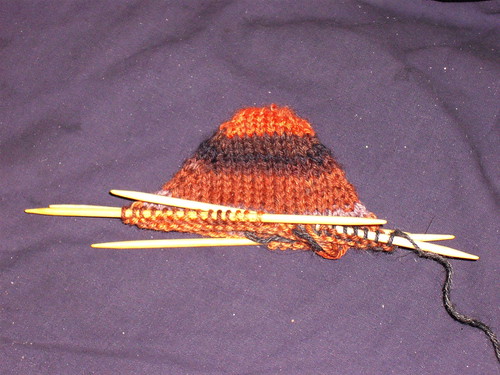
The toe will have a slightly more oblique slant on the side with twice as many increases (in this case, the left). It's a slight difference, but means that, when on the foot, the stitches will stretch more naturally across your toes.
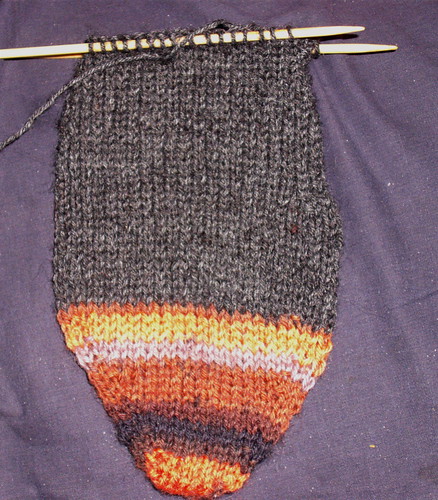
The body of the foot
With the toe done, knit 3 centimetres of knit stitch (stockingette).
Now, if the instep is smaller than the ball of the foot, decrease by knitting the second and third last stitches of one needle together and knitting an SSK on the second and third stitches of the next, both on the opposite side to where you did twice as many increases. Repeat this until you have the right number of stitches for the instep. SSK: Insert the right needle into the first stitch on the left as if to knit, then slip it. Repeat for the second. Insert the left needle through the front loops of the two slipped stitches, wrap the yarn around the right needle and pull it through, slipping the two stitches off the needle. (Video)
In my case, my instep is 15 cm around and my gauge is 3 stitches/cm, so I calculate the number of stitches for the instep as:
15 cm * 3 stitches / cm == 45 stitches
As that's an odd number and I'm using somewhat stretchy yarn, I round down to 44 stitches. To calculate the number of rounds I need to decrease on, I subtract the instep stitches from the stitches around the ball of my foot and divide by 2.
48 stitches around the ball - 44 stitches around the instep == 4 stitches
4 stitches / 2 decreases/round == 2 rounds of decreases
So, on the next two rounds, this being a left sock, I knit the second and third-last stitches of needle 1 together and I SSK the second and third stitches on needle 2. Were it a right sock, I would knit the second and third-last stitches of needle 3 together and SSK the second and third stitches of needle 4.
Repeat this for as many rounds as needed to get to the instep size, then continue knitting stockingette.
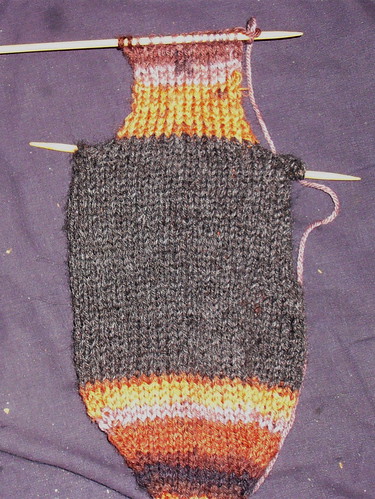
Shaping a gusseted heel
Begin the heel when the sock is between 60% and 70% the length of the foot, shorter for stretchy yarn, longer for more solid. The heel that I'm using is an adaptation of the pattern found here.
My foot is 22 cm long and I'm using stretchy yarn, so I calculate it as follows:
22 cm * 0.6 == 13.2 cm
Knowing that I have 4 rows of stockingette per centimetre, I knit 13 centimetres of foot, plus one row.
In the last few rows before shaping the heel, I increase back to the size of the ball of the foot, knitting front and back on the second-last stitch of needle 1 and doing another KFB on the second stitch of needle 2. Were this a right sock, I would do the same with needles 3 and 4 instead.
I want twice as many rows to increase as to decrease, so I do the two KFBs, followed by a round of knit stitch, twice, ending on a round of knit stitch.
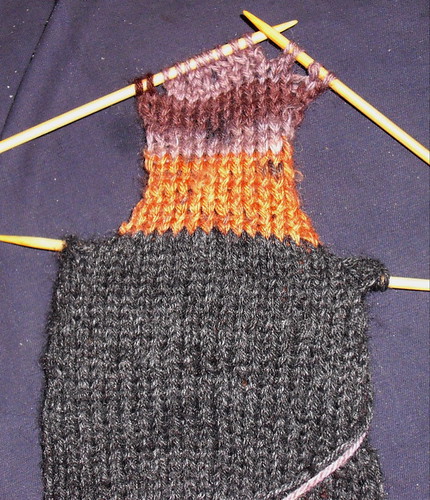
Now, place all of the top stitches, plus 2/3 of the bottom stitches, onto another needle or a piece of scrap yarn.
In my case, the sock is 48 stitches around, so I place the 24 top stitches onto a needle, as well as 1/3 the bottom stitches, divided equally between left and right sides.
24 bottom stitches * 2 / 3 == 16
24 bottom stitches - 16 stitches remaining == 8 stitches set aside
8 stitches set aside / 2 == 4 stitches from each side
The stitches set aside are left alone while you knit the heel flap as flat stockingette (knit the right side, purl the wrong side). Continue knitting that until the sock plus heel flap is 90% or 95% the length of the foot.
In my case, with a 22 cm foot and stretchy yarn, I want the sock to total:
22 cm * 0.9 == 19.8 cm
Once the heel flap is the proper length, starting on the right side, knit all but the two last stitches, turn your work and purl all but the two last stitches. On the next row, knit all but the four last stitches, turn your work and purl all but the four last stitches.
Repeat this until only half the stitches on the heel flap are live, then, starting on a knit row, knit the live stitches, knitting the last live stitch together with the first one that was left alone. Finish the row by knitting the second stitch that was left alone.
On the next row, purl the live stitches, purling the last one together with the first one left alone. Purl the second one left alone. Repeat these two steps until all the stitches on the heel flap are live again. At this point, you will be on a knit row. Knit back across these to position the yarn for picking up the stitches.
Next, divide the stitches on the heel flap onto two double pointed needles and, starting on the side with the yarn, pick up the stitches along the side of the heel flap by lifting the stitch with another needle and knitting into it with the double pointed needle holding the yarn. (Video of picking up stitches)
Repeat this for every row of the heel flap plus one stitch beside your saved stitches. This ensures that there's no hole where the heel meets the top of the sock.
With a second double-pointed needle, knit half of the saved stitches. With a third, knit the other half and pick up along the other side of the heel flap. Finally, on the fourth needle, knit the remaining half of the heel flap. You should have two needles with few stitches on them and two needles with quite a lot, having picked up along the heel flap.
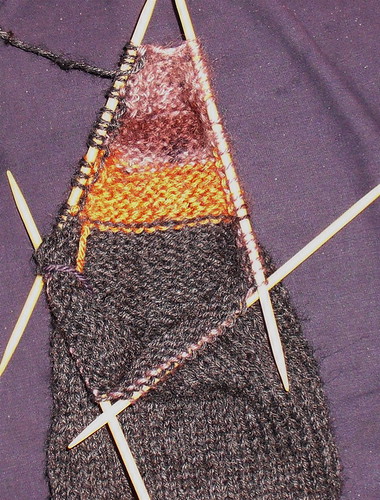
Divide the stitches among your four double-pointed needles so that the two that meet at the back of the heel have the heel stitches, the heel flap stitches and four of the stitches from the front of the sock.
From now on, the back of the sock is the starting point. The first needle is the left-hand heel needle, the second and third are the two on the front and the fourth is the other heel needle.
Knit all but 6 stitches on the first double-pointed needle, knit two stitches together, place a marker after that stitch, then knit the next four. Continue to knit across the top of the sock, placing a marker after the first four stitches on the fourth double-pointed needle. SSK the next two stitches, then continue to knit.
Continue knitting in the round, knitting the two before the first marker together and SSKing the two after the second marker, until you have the same number of stitches as for the instep.
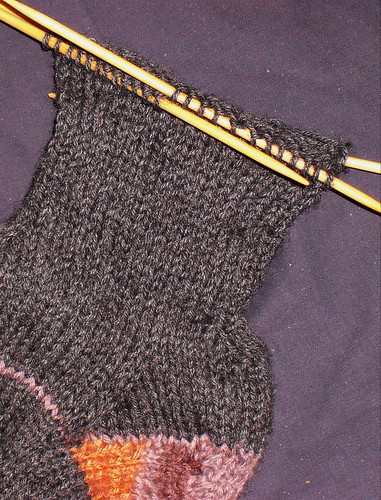
Ankle and calf
Knit one round after you finish shaping the heel. Now, you want to increase or decrease to the circumference of the ankle.
To decrease, knit one on the first needle, then SSK, knit the rest of the stitches until the third-last stitch on the fourth needle and knit two together, knitting the final stitch. Repeat this until you have the correct number of stitches for the ankle.
To increase, knit one on the first needle, knit the second stitch front and back, then knit the rest of the stitches until the second-last stitch on the fourth needle, KFB and knit the last stitch. Knit the next round normally and repeat these two rounds until you have the correct number of stitches for the ankle.
Continue to knit until you have 5 centimetres less than the desired length.
If you decreased for the ankle, knit half the stitches on each needle, then knit the next stitch front and back, repeating this for each needle, followed by a round of knit stitch, until you have the same number of stitches as you did for the ball of the foot.
The number of stitches around the calf should be a number evenly divisible by four.
Knit 5 centimetres of ribbing. The easiest way is to knit two stitches and purl the next two, repeating this around the cuff of the sock for 5 centimetres.
For these socks, I went with a variant ribbing pattern, where on one row, I knit two, placed the yarn in front of the work as if to purl, slipped two stitches purlwise, then placed the yarn at the back of the work again, repeating that for one round, then knitting the next.
When you have enough ribbing, cast off very loosely.
0 comments:
Post a Comment