|
|
|
A few days ago, I was approached by colorlessblue. She had a pretty sock pattern made up of triangles, but it required her to use exactly 64 stitches around.
Her difficulty was that she couldn't find a gauge in which that worked. Me first reaction was to say, "well, that's not a big deal, the pattern is trivial to make fit on a multiple of 12 or 14 stitches." Then I tried to explain what stitches to remove, and it really quickly became messy.
So I stopped for 15 minutes or so and drew a few patterns. As I started, she clarified that she didn't want to purl.
This is what resulted:
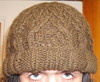
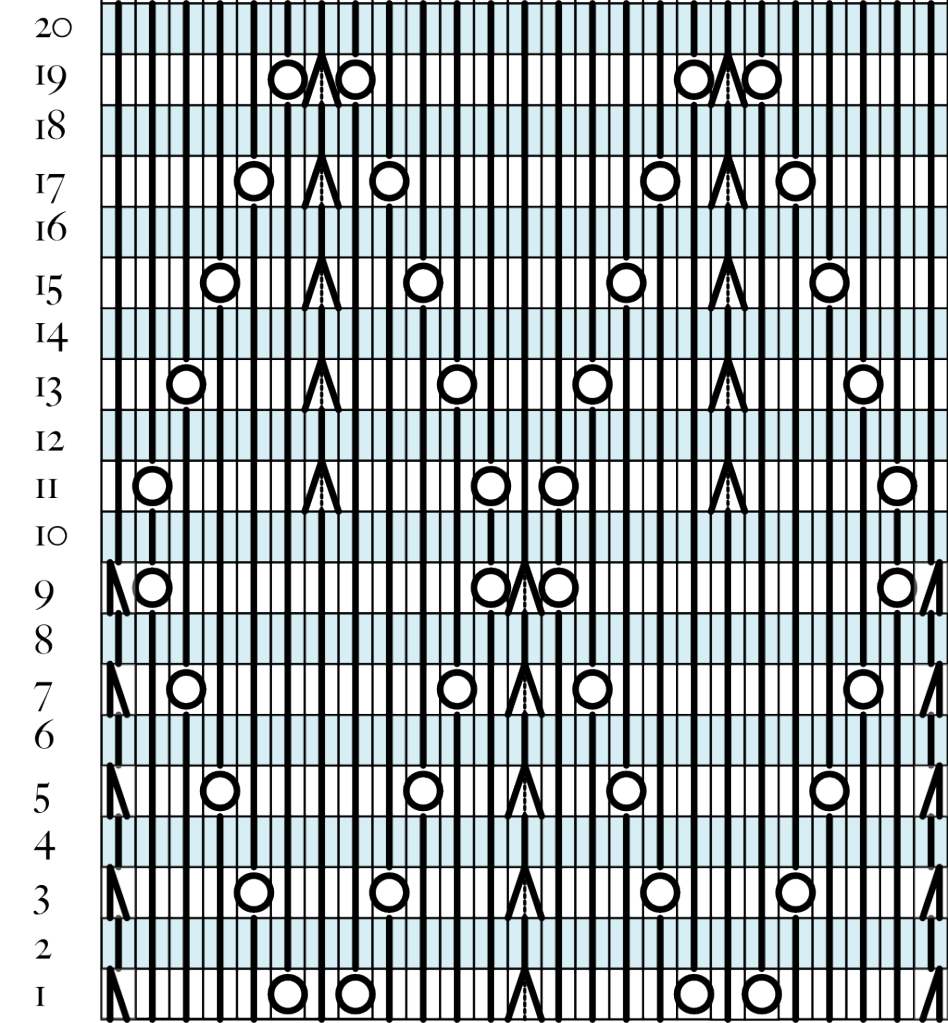
However, the absence of purl stitches meant that the resulting pattern would be triangles of vertical knit stitches with a zigzag border of slanted stitches. So, my next thought was, "Why not make the slanted stitches into the motif. That resulted in this pattern:
 It's not perfect by any means. The k2tog and SSK being next to each other results in a ladder. Were I continuing that tangent, I'd turn all paired decreases into double decreases. Also, as it turns out, I didn't like how the paired yarn overs at the apex of the triangle looked.
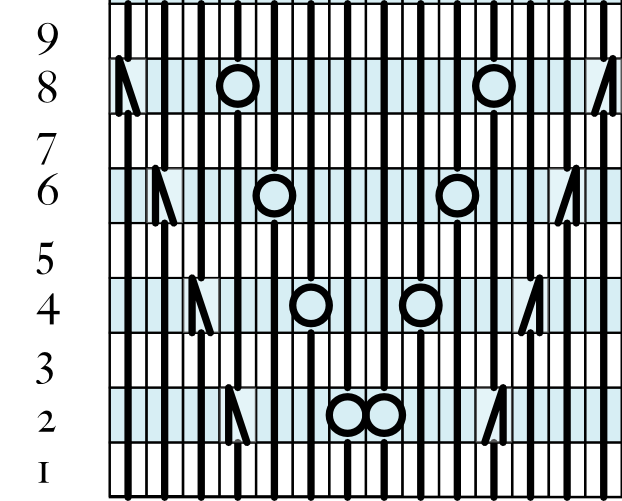
At the same time as I was thinking that, I also wondered what would happen if the triangles were offset by half a repeat, giving the whole pattern a longer period before it repeats.
It's not perfect by any means. The k2tog and SSK being next to each other results in a ladder. Were I continuing that tangent, I'd turn all paired decreases into double decreases. Also, as it turns out, I didn't like how the paired yarn overs at the apex of the triangle looked.
At the same time as I was thinking that, I also wondered what would happen if the triangles were offset by half a repeat, giving the whole pattern a longer period before it repeats.
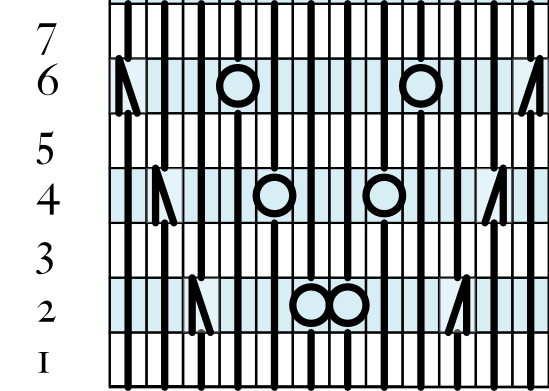
This pattern (which is almost the same as a Barbara Walker one) has the property that the knit stitches actually form themselves into vein-like curves: the diamonds end up looking like oval leaves.
I tried knitting it half in knit and half in purl, to see if that would give the leaves more shape, but that ended up being a step too far: The lace lost enough of its definition that the pattern looked awkward and no longer anything like leaves.
I think I'm likely to use this one at some point, possibly as a motif one some leaf-patterned socks that I keep not getting around to. Before I do, I'm likely to put it through one more mutation, reducing it to about half the size and extending the widest part of the leaf by two rows, so that it more accurately matches the shape of a beech leaf.
Most of my charts seem to follow a similar pattern of starting point and progressive mutation, followed by a test knit, correction of discovered problems, a further test knit and possibly correcting steps that went too far.
It's like saying "just one more row", but "just one more change" instead.
I'd be the first to admit that I think of myself as a sock-and-hat knitter. I like my projects the way I... Never mind, I'm not going to finish that chestnut. Suffice it to say that I like my projects small enough that I can always keep the end in sight.
That said, I picked up two bales of wool this week; bulky natural wool in a pleasant brown. Along with that, I expanded what is apparently becoming an Addi collection. Essentially, I've committed to knitting a sweater.
As is my wont, I started by browsing the internet to determine what kind of sweater I wanted, then searching Ravelry for patterns. As usually happens, I got frustrated. Fortunately, Elizabeth Zimmerman has a pattern, described in proportions, for a warm baggy pullover. Less-fortunately, it's steeked. After more research and not a little bit of swearing, I decided to blissfully close my eyes and pay no mind to those instructions. After all, I have many many many stitches between me and slicing two holes into my knitting.
Plenty of time to chicken out and re-think the pattern as two trapezoids sewn together with the arms attached by picking up off the selvedge. Plenty of time to consider that sewing two trapezoids together will be far less solid than biting the bullet and knitting the whole thing as a tapered cylinder.
Plenty of time to knit swatches.
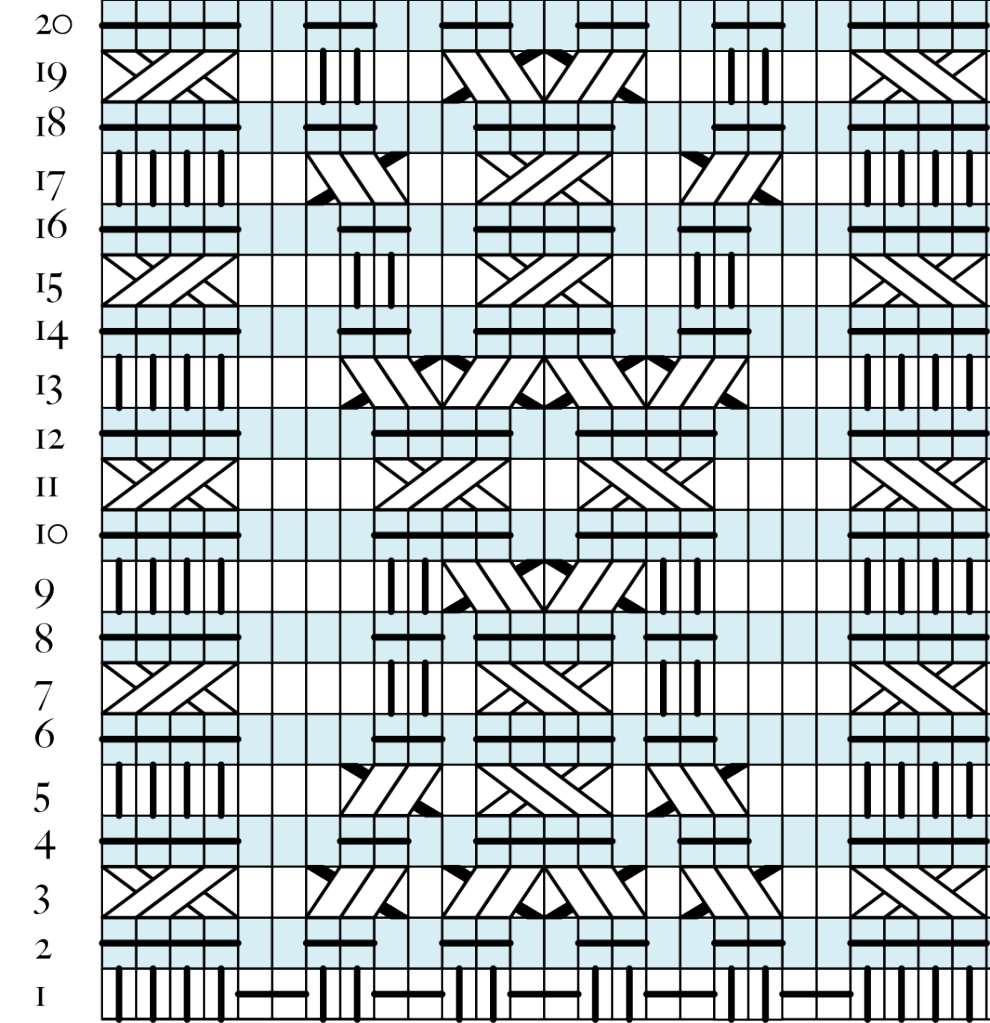
This is what I'm using as a swatch. This pattern, repeated over and over, is intended to make up two front panels of the sweater. The intent is to swatch it to see if it looks right and also to test texture and gauge of the wool and needles. As I'm more than mildly worried that 5mm needles (my preferred size for worsted) will simply be too tiny for bulky.
After only a little bit of discussion and plotting, I realised that the back of the sweater really deserves a different pattern from the front.

Rather than two panels of four-strand braids, the back has a single panel, centred, that makes a twelve-strand braid or knot. Fortunately, this pattern will look pleasing so long as the front panel does, so I only need to knit the one swatch as a test pattern.
In keeping with my three-project rule, I'm not to start a pair of socks or a hat or anything else until I've finished with this swatch. Further, once I've committed to the sweater, that's one of the three available slots for patterns taken up. So, likely, I'll knit the swatch, knit some socks (I have a pattern that I want to try), possibly knit some more socks (I actually have two patterns waiting for me), maybe finish a hat, and then get to the sweater, just in time for it to be too warm out for sweaters.
So, I like Ravelry's designer pages. They're great for indulging my vanity. I tend to check my downloads every once in a while, just out of curiosity, to see if anyone's downloading my patterns.
But one thing it's lacking, and that I'm generally curious about, is how many times they've been downloaded in total. The page doesn't indulge that curiosity. I initially considered putting in a feature request, but then got sidetracked by geekery.
See, the Ravelry downloads page is remarkably readable HTML. Which led me to a quick and easy conclusion: I can fix this in Greasemonkey.
Even having forgotten most of what I learned about the Javascript HTML DOM last time I wrote a Greasemonkey script, it took just over two hours.

Becomes:
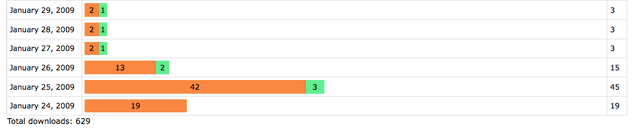
With added daily counts on the right-hand column and a "Total Downloads" field at the bottom of the graph.
Installation
If you are using Firefox without Greasemonkey, a compiled Firefox addon is available here. Download it, unzip it and drag it into your Firefox window. It should ask to install, like a normal add-on.
If you have Greasemonkey installed or are using Opera, download the Greasemonkey script file and install the user.js file by:
Firefox: by dragging the file into your Firefox window. Greasemonkey should open, displaying the affected URL and ask you if you wish to install.
Opera: The path where User Javascript files are loaded from is indicated in Preferences/Advanced/Content/Javascript Options. If no path is indicated, choose one. Place the user.js file into that directory.
So, I'm a knitter. And I
pretend to be a designer some days, when I'm not knitting
endless swathes of k2, p2 rib. But
first and foremost, I'm an unabashed geek.
As such, I took a look
at KnitML. And it's neat.
Well, in theory, it's neat. In practice, I haven't got the java
dependencies set up on my computer yet to play with it. I do
intend to do that, and am downloading them, but while I wait for
them, I want to ponder through an idea that's been percolating
in my brain.
Namely, I think of knitting patterns in two ways. One is the
chart. This is how I write patterns, really. And given the
choice between a chart and a list of stitches, I'll pick the
chart every time.
It's a question of information density. The chart presents
all the information that I need, in the least amount of space
while still being human-readable.
So, let's look at a chart.

It's a fairly simple pattern, embedded
moss stitch rib. And can be easily transformed into a
written pattern:
- p2, k2, p1, k1, repeat to end of round
- p2, k2, p1, k1, repeat to end of round
- p2, k1, p1, k2, repeat to end of round
- p2, k1, p1, k2, repeat to end of round
This is where my brain starts making clicky noises. See, my
immediate reaction to that is that it's a simple program. One
that generates a handsome little ribbing.
However, my second line of thought runs straight for a
programming principle: Don't Repeat Yourself. My process for
generating a pattern is to draw charts
in Inkscape, test those
charts by knitting them, then translate the chart into written
instructions. In future, I may also want to make my charts
available in KnitML.
What this immediately says to me as a programmer is that I
should have a single piece of data from which I can generate:
- PNG graphics
This is the format I use to show
charts. It's a useful format in that it does a good job
of reducing low-colour line drawings (like knitting
charts) to a fairly small file size with no loss of detail
or crispness.
This is an even worse format to use as
a data source, though. Rather than just interpreting the
XML that SVG gives, I'd have to start into OCR
territory.
- SVG graphics
This is the format that I actually use
to make charts. Unfortunately, it would be a considerable
effort to use it as a starting point: Anything more
complicated than a knit or purl stitch are relatively
complex "groups", rather than simple objects.
However, they work admirably as a way to draw charts, and
from my perusal of the spec, should be able to be drawn
programmatically fairly easily.
- HTML lists
This actually isn't a bad starting
point. Not good enough that I'd want to use it as a data
source, but not bad enough, either, to discard it out of
hand.
Specifically, if I look at the HTML describing
the pattern:
<ol>
<li> p2, k2, p1, k1, repeat to end of round
<li> p2, k2, p1, k1, repeat to end of round
<li> p2, k1, p1, k2, repeat to end of round
<li> p2, k1, p1, k2, repeat to end of round
</ol>
Other than the <ol> and <li> tags, this
actually isn't a bad representation of the data at all.
- Plaintext
What if I were to use the plaintext
representation of the aforementioned list:
p2, k2, p1, k1, repeat to end of round
p2, k2, p1, k1, repeat to end of round
p2, k1, p1, k2, repeat to end of round
p2, k1, p1, k2, repeat to end of round
That's actually, as I alluded before, a programmatic
representation of knitting. And, were it not for that
pesky "repeat to end of round", would be nearly
perfect.
In fact, this is relatively close to what
KnitML uses as a human-readable format, according to my
reading of the spec.
- S-Expressions
These little gems are the core of Lisp, and are easily
transformable to and from XML if the need arises.
The core elements to them are lists and atoms. A list is
multiple atoms surrounded by parentheses and separated by
spaces. An atom is some text
representing something.
Thus, the pattern described above becomes:
(repeat 2
(repeat-to-end (p2 k2 p1 k1)))
(repeat 2
(repeat-to-end (p2 k1 p1 k2)))
And any Lisp programmer reading this just started twitching. As
that's not properly-formed Lisp. On the other hand, it does
represent a very interesting way to mix data and instructions.
Patterns become lists of stitches and transformative operations performed on those stitches. It's knitting as a pseudo-mathematical notation.
So, taking s-expressions as a base, what does it all mean?
Well, in that list of representations, the further along I went,
the more the representation changed from being a depiction
of the data to a representation. By the time we reach the
plaintext version of the pattern, it is recognisable as a
rudimentary program.
The s-expression version isn't even a rudimentary one; if it were
fed into an interpreter that recognised the words and symbols used,
it is a program to generate a knitting pattern.
Now that offers some interesting prospects, because the output of
the interpreter by no means has to be fixed. For instance, I could
have one interpreter that reads the pattern as a way to generate a
plain text file, another interpreter that generates an SVG graphic
and a third that reads the pattern as a way to generate the
equivalent KnitML file.
Why does all this matter? Well, I've become interested, in the
past weeks, in the idea of an editor where I type in a row of
stitches and it appears on the screen as a graphical pattern.
Thinking about how to represent stitches is a first step on the road
to knitting pattern zen.
Someday, I'm going to learn to knit tiny swatches. The first one I did for this hat was enormous, the size of a tea towel, but highlighted more than a few mistakes that I was making.
Luckily, the cable pattern is composed of repeated motifs. So, seeing these motifs work once was enough to know how they work throughout.
Unfortunately, my first sketch for the lace pattern was done somewhat foolishly. I believed that I could guess, from the pattern, what it would look like, conveniently forgetting that lace isn't just a pattern of holes: it also relies on a structure of slanted and upright stitches.
What I'm trying to say is that my first sketch was uglier than ugly. I've revised it now, and on paper, it looks nice. In practice, I don't know. So I'm doing the sensible thing this time and knitting it again.
There needs to be a pattern to the decreases anyhow, and I've no idea what that'll be. Thus, he sensible thing is 30 rows of swatch, a lifeline and then some puzzling out what decreases go where.
So, I'm swatching a project. A project that's 2/3 cabling and 1/3 lace. A project where there's at least one stitch pattern that's heavily used and may not even be possible.
And as is my wont, perhaps foolishly, I'm swatching it flat. 20 rows, 51 stitches. Which is fine for the lace pattern: It was meant to be flat and I can live with that. The cable pattern is much worse.
It actually looks reasonable enough charted in the round. I have a very rough sketch, written before I realised a few things. Flat, though, that's a different story.

I'm deliberately only knitting a fraction of the pattern as a swatch, and that still took me an hour and a half to draw. It's going to be fun when I draw the entire pattern, seeing as that chart is 1/125th of the pattern.
At least the pattern will be flat.
Well, after realising that I was going to be working the chart forever and ever, I re-charted the lace pattern to run 30 rows, the minimum possible to see the pattern working.
The cable pattern is only 20, but if I'm feeling ambitions, I'll extend it, just to see the whole sweep of the pattern. Unfortunately, this actually makes the swatch larger. Fortunately, only by 100 stitches.
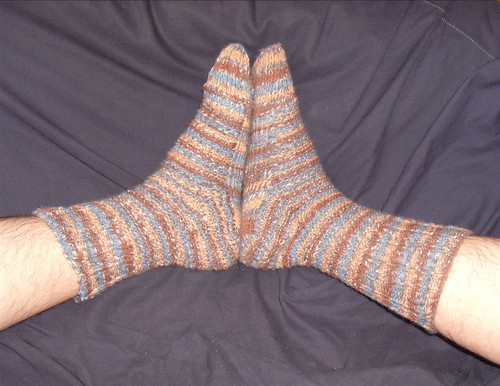

Well, they took two weeks to get together, but I'm happy to say that these socks are finally a pair. Happily, they are indeed as thick, dense and warm as I'd hoped when I first started planning for them.
Requirements
- 300m sport weight yarn
- 3.5mm double-pointed needles
- 3.5mm straight needles
- A crochet hook
Measurements
- The circumference of the ball of the foot.
- The length of the foot.
- The circumference of the ankle.
- The circumference of the middle calf.
- Your gauge in circular heel stitch.
- Your gauge in seed rib.
For the gauges, fear not. You'll be knitting a number (quite a
number, in fact) of rounds of those stitches before you need to know
gauge, so it's simple to measure directly on the sock
itself.
Instructions
Casting On
Perform a provisional cast on of eight stitches, knitting four
rows, as for the Simple Toe-Up Socks
Heel Stitch Toe

Stitches between {braces} are repeated the number of times indicated. Stitch counts are in brackets and indicate the number of stitches on both the top and the bottom.
Knit this pattern until you have enough stitches around to go snugly around the ball of the foot. End on an even-numbered round.
- Knit the entire round.
- Top: k1, kfb, k4, kfb, k1 (10)
Bottom: k1, kfb, k4, kfb, k1
- Top: k2, {s1 wyib, k1}(3 times), k2
Bottom: k2, {k1, s1 wyib}(3 times), k2
- Top: k8, kfb, k1 (11)
Bottom: k1, kfb, k8
- Top: k2, {s1 wyib, k1}(4 times), k1
Bottom: k1, {k1, s1 wyib}(4 times), k2
- Top: k1, kfb, k7, kfb, k1 (13)
Bottom: k1, kfb, k7, kfb, k1
- Top: k3, {s1 wyib, k1}(4 times), k2
Bottom: k2, {k1, s1 wyib}(4 times), k3
- Top: k11, kfb, k1 (14)
Bottom: k1, kfb, k11
- Top: k3, {s1 wyib, k1}(5 times), k1
Bottom: k1, {k1, s1 wyib}(5 times), k3
- Top: k1, kfb, k10, kfb, k1 (16)
Bottom: k1, kfb, k10, kfb, k1
- Top: k2, {s1 wyib, k1}(6 times), k2
Bottom: k2, {k1, s1 wyib}(6 times), k2
- Top: k14, kfb, k1 (17)
Bottom: k1, kfb, k14
- Top: k2, {s1 wyib, k1}(7 times), k1
Bottom: k1, {k1, s1 wyib}(7 times), k2
- Top: k1, kfb, k13, kfb, k1 (19)
Bottom: k1, kfb, k13, kfb, k1
- Top: k3, {s1 wyib, k1}(7 times), k2
Bottom: k2, {k1, s1 wyib}(7 times), k3
- Top: k17, kfb, k1 (20)
Bottom: k1, kfb, k17
- Top: k3, {s1 wyib, k1}(8 times), k1
Bottom: k1, {k1, s1 wyib}(8 times), k3
- Top: k1, kfb, k16, kfb, k1 (22)
Bottom: k1, kfb, k16, kfb, k1
- Top: k2, {s1 wyib, k1}(9 times), k2
Bottom: k2, {k1, s1 wyib}(9 times), k2
- Top: k20, kfb, k1 (23)
Bottom: k1, kfb, k20
- Top: k2, {s1 wyib, k1}(10 times), k1
Bottom: k1, {k1, s1 wyib}(10 times), k2
- Top: k1, kfb, k19, kfb, k1 (25)
Bottom: k1, kfb, k19, kfb, k1
- Top: k2, {s1 wyib, k1}(10 times), k2
Bottom: k2, {k1, s1 wyib}(10 times), k2
- Top: k23, kfb, k1 (26)
Bottom: k1, kfb, k23
Knitting the body of the sock

First, you'll need to divide the stitches again, this time onto
three needles.
Count the stitches on needles 3 and 4 and divide it by three,
rounding down. This is the number of stitches that should be moved
from the sole to the sides and top of the sock. For the rest of the
pattern, these will be referred to as “side stitches”.
For example, I have 25 stitches on needles 3 and 4 combined:
25 / 3 = 8 1/3
8 1/3 ≈ 8
So I want to move eight stitches, or four from each side. First, transfer all the stitches from needle 4 to needle 3. Needle 3 will knit the sole of the sock, needles 1 and 2 will knit the top. Next, place a marker at the end of needle 1 and transfer half of the side stitches from needle 3 to needle 1. Place a marker at the end of needle 2 and transfer the other half of the stitches from needle 3 to needle 2. If you are moving an odd number of stitches, move the extra stitch to the needle that has fewer toe increases (needle 1 for a right sock, needle 2 for a left.)
Count the stitches on needle 3 again. If there is an odd number of stitches, perfect. If, on the other hand, it's even, transfer one more stitch. If you transferred an odd number before, place this extra stitch on the opposite needle from the odd stitch. Otherwise, place it on the needle with fewer toe increases, as above.
The pattern for the body of the sock is 6 rounds long. Stitches in {braces} are repeated, either to the end of needle 3 (for bottom stitches) or until the end of needle 2 (for top). The side stitches are knit in pattern for the top.
- Top: {Knit 1}
Bottom: {Purl 1}
- Top: {k1, p1}
Bottom: p1, {k1, p1}
- Top: {p1}
Bottom: p1, {yop, s1 wyib, purl 1} Here, the yarn should wrap over the slipped stitch, making one stitch crossed over the other.
- Top: {k1}
Bottom: p1, {drop the yo from the previous row, si wyib, p1} Dropping the yarn over looks like it should leave a very loose stitch around the slipped stitch. However, purling the next stitch adjusts its tension, bringing it tighter once more.
- Top: {p1, k1}
Bottom: p1, {s1 wyib, p1}
- Top: {p1}
Bottom: p1, {s1 wyib, p1}

Knitting a gusseted heel
This is a slight adaptation of the heel described in the Simple Toe-Up Socks pattern.
Continue knitting the 6 rounds of pattern for the body until it measures 70% of the length of the foot. For me, each pattern repeat is less than a centimetre long, so you can expect this to be rather a lot of knitting. My foot is 22cm long, so I calculate that as follows:
22 cm ∗ 0.7 = 15.39 cm
Finish on round 6 of the body pattern, having just knit the bottom of the sock.
For the next while, needles 1 and 2 will not be used, so do what you will with the stitches on them, be it transferring them to a holder, placing them on a spare needle or scrap of yarn or simply leaving them on the two double-pointed needles.
The heel is knit flat and the yarn is currently placed so that the next row is the wrong side, so, to complete the shadow check pattern, knit the row, which will finish the sole with a row of purl stitches. Then, with straight needles of the same size as your double-pointed needles, knit the following 2-row pattern:
Heel Stitch
- (right side) k1, {s1, k1}
- Purl the row
This is heel stitch again. However, since there are no increases or decreases at play, it's 16 times simpler than it was at the toe.
Knit this until the heel is 95% of the length of the foot (i.e. 4-6 rows below the foot length).
Turning the heel
Next, knit row 1 of the heel stitch pattern, stopping 2 stitches before the end of the row. Turn the sock and knit row 2, stopping 2 stitches before the end of the row.
Knit row 1 again, stopping 4 stitches before the end of the row, then row 2, stopping 4 stitches before the end of the row.
Continue like this, losing two more stitches each row, until you have either 9 or 7 stitches left live and have just completed a purl row (row 2).
Next, knit row 1 again, knitting the last live stitch together with
the first saved stitch and knitting the second saved stitch. Turn
your work and knit row 2, purling the last live stitch together with
the first saved stitch and purling the second saved stitch.
Repeat those two steps until all the stitches are live again.
Congratulations. You're halfway done the heel.
Picking up from the heel flap
You should have just completed a purl row so, to get your
yarn in position to knit in the round, knit across the heel one more
time, this time using two double-pointed needles, one holding each
half of the heel.
Begin picking up stitches along the side of the heel flap with the
second double-pointed needle used to knit the heel. If you look at
the selvedge, you should have a raised row of slipped stitches below a
slightly-curled row of knit stitches. You'll want to pick up one
stitch per row along the heel, so insert a needle in the hole beneath
the two strands of the knit stitch, insert your double-pointed needle
into the hole underneath it and knit one stitch.
Repeat this for every row of the heel, as well as picking up two
stitches from the first stitch on the top of the sock in order to
ensure that there's not a hole between the heel and the top of the
sock. Note the number of stitches you picked up, place a marker at
the end of the needle and knit the side stitches onto it. This keeps
you from working the decreases across a gap between needles.
Knit across the top of the sock, transferring stitches onto two
double-pointed needles if needs be. With the second double-pointed
needle, pick up the same number of stitches along the heel flap as you
did on the other side, leaving a marker before the picked-up
stitches.

Finally, transfer the picked-up stitches and the side
stitches to the other needle on the back of the sock. Time for the
final change in needle numbering. As before, the needles are numbered
in clockwise order. The two across the top of the foot are needles 2
and 3. The two making up the heel are 1 and 4.
That's it. The heel has been turned, the stitches have been picked
up. All that's left is to decrease the heel gusset until the sock is
the same size as it was at the ball of the foot.
Gusseting
Compared to everything you've been through so far, this bit is
easy. Knit each round using the seed rib
pattern. To determine where in the pattern to start count the number
of stitches on needle 1. If it's even, start the pattern on round 1,
if it's odd, start on round 4.
Two stitches before the marker on needle 1, stop. If you are on a
knit round, K2TOG. If you are on a purl
round, P2TOG. If you are on a seed round,
do not decrease.
Continue knitting seed rib until you
get to the marker on needle 4. If you are on a knit round, SSK. If you are on a purl round, S1, P1, PSSO. If you are on a seed round, do
not decrease.
Continue knitting
this pattern until you have the same number of stitches as you did for
the ball of the foot.
Seed Rib
- Knit the round
- k1, p1, repeat
- Purl the round
- Knit the round
- p1, k1, repeat
- Purl the round

The half above the black line is the normal pattern repeat. The part below is the general pattern for the gusset decreases.
Ankle
If the ankle is to be smaller than the ball of the foot, continue
knitting seed rib for three rounds. Once
you have done that, work decreases as follows:
If you are on a seed round, do not decrease.
If you are on a knit round, knit the first stitch of needle 1,
SSK, knit to the last three stitches on
needle 4, K2TOG, K1.
If you are on a purl round, purl one stitch, S1, P1, PSSO, purl to the last three stitches on
needle 4, P2TOG, P1.
Decrease in this way until you have the right number of stitches
for the ankle.
Calf
Knit four repeats of the seed rib
pattern. Count your stitches. If they are not divisible by 6,
increase via KFBs in the knit rounds as you knit rounds 1-5 of a fifth repeat. Otherwise, knit those rounds without increase.
That done, it's time to begin ribbing. The pattern for the rib is
another Barbara Walker one: embedded moss stitch
ribbing, with a single amendment. It'll be worked over 6
stitches, rather than 7, to ensure that its repeat length matches that
of the seed rib.
Embedded Moss Stitch Ribbing
Repeat these 6 stitches around the entire circumference of the sock.
- p2, k2, p1, k1
- p2, k2, p1, k1
- p2, k1, p1, k2
- p2, k1, p2, k2
This gives a rib that is a 2-stitch purl gutter between columns of
knit stitches, with a twocolumn moss stitch pattern between them.
Knit this ribbing until the sock is as long as you want it, knit
two rounds in P2, K4 ribbing, then cast off very loosely with the
following pattern: P2, K4.

Well, I got lucky. My first knit of the ankle and calf turned out to be exactly what I wanted and my lifeline ended up being wholly unnecessary. So, with only a dozen metres or so of yarn left on my first ball, I turn to the second and begin knitting the second sock.
This becomes helpful proofreading, as for the second sock, I follow the pattern that I wrote while knitting the first. If it matches, I post the pattern as-is. If not, I edit the erroneous parts of the pattern.
While I was terribly happy to open Ravelry and mark the pattern as 50% done, I recognise that the second sock is likely to take almost as long as the first, as the slowness wasn't due to revising, but rather because the sock was simply a hell of a lot of knitting.
In a little more thinking aloud, I charted the stitch patterns that I'm currently thinking about. The sensible next step would be to swatch them, but I'm going to be daft and simply lifeline my socks in another few pattern repeats and use them as the swatch.
Because I'm thinking about these patterns for socks, they're all given as circular directions, rather than flat.
Seed Rib
The half above the black line is the normal pattern repeat. The part below is the general pattern for the gusset decreases.
Stitches with a green background are repeated.
Mistake Stitch Rib

This pattern uses a multiple of 4 stitches plus 3. The stritches in green are repeated.
Embedded Moss Stitch Rib
The six stitches of this pattern are repeated throughout.
ETA (08/02/2009): Updated with better chart images.
ETA (12/02/2009): Changed the Seed Rib pattern, because the pattern of decreases in the seed rows was near-impossible to explain.
So, these socks take three, possibly four stitch patterns: heel stitch, shadow check, a stitch whose name I can't find, but will call seed rib and a pattern for the ribbing along the calf.
Shadow check and heel stitch are described in my original post about the shadow check socks. The unnamed stitch, which I shall, in future, call seed rib, is two rows garter, one row seed, two rows garter and one row seed (in the opposite pattern to the previous seed row).
My first humbling lesson was that heel stitch is incredibly difficult in the round. I've played with that some more, and in my working pattern, have managed to simplify the pattern for the toe dramatically.
My second was that shadow check draws the fabric far too tight to have any stockingette in the same row with it. That realisation led directly to my changing the seed rib from a part of the top to an all-over pattern, continuing it along the heel gusset. The decision to include it over the gusset created its own problems, though.
When decreasing for the gusset, to keep the pattern shrinking at an appropriate rate, there need to be decreases every round. The problem with that is that every third row is seed, and the decreases need to happen in pattern. Approaching the decreases, there are two possible patterns: k1, p1, k1, (marker) p1, k1 or p1, k1, p1, (marker) k1, p1. As you can see, either one of those patterns means that a 2-stitch decrease will double up a stitch. Taking the first as an example, if you k2tog, you end up with k1, k2tog, (marker) p1, k1 and if you p2tog, you have the opposite problem: k1, p2tog, (marker) p1, k1.
After several rounds of deliberation, I came up with the following pattern for decreasing the gusset in seed rows:
- Knit in pattern to two stitches before marker.
- If the last stitch was knit, k2tog. If it was purled, p2tog.
- Knit in pattern to the second marker.
- If the last stitch was knit, s1, p1, psso. If it was purled, ssk.
- Knit in pattern to the end of the round.
This ensures that the paired stitches match up nicely. Its biggest advantage, though, is that it stops what I was doing before, namely looking at the previous seed row and guessing based on that.
I still haven't decided what to do for the ribbing around the calf, though. Conceivably, I could knit the lot in seed rib, but I think I'd feel that I was ducking out. I expect and anticipate that I'll end up increasing to a multiple of five stitches and relying on that lovely standby, slip-stitch rib.
On the other hand Barbara Walker has two patterns that intrigue me. One is mistake-stitch ribbing, which looks interesting from the photos, but would have to be rather altered to work as a circular pattern. What it is is k2, p2 rib, worked on one stitch less than the needed multiple of 4 stitches, so that there is a column of knit surrounded by jagged knit and purl stitches.
The other is embedded moss stitch ribbing. That stitch pattern actually fits, interestingly, with seed rib. What it is is a pair of knit stitches enclosing two moss stitches. Converting that would be easy and looks like it'll fit with the overall texture.
|
|