|
|
|
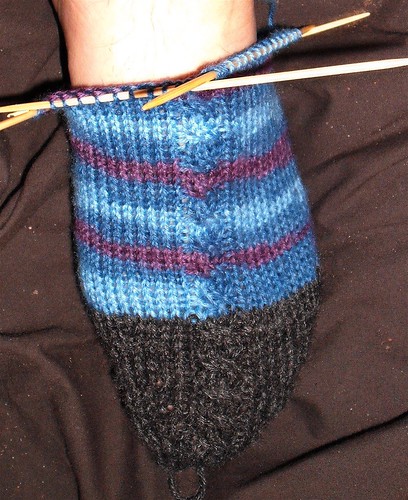
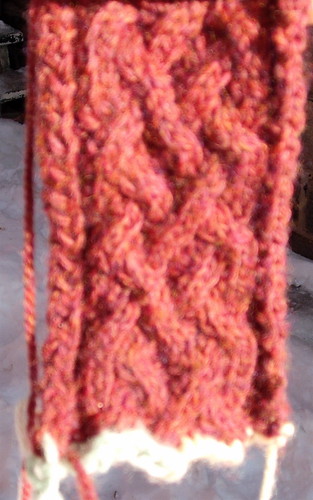
This is how far I've got in knitting the socks that woke me up. I'm just about ready to start knitting the heel flap. After that, the cable that features prominently on the foot here will split into two branches, each of which will twirl in opposite directions.
The cables will continue twisting in the same way as the cable on the foot, but will gradually make their way to the back of the sock, cross each other, then come back to the front of the sock again.
And again, the nice thing about this design is that, when it comes time to write down the pattern (which I seem to do after one sock, then follow it for the second) it's actually relatively easy to explain. Or, rather, it'll be easy to write down the exact stitches to make to end up with the same result.
I'd be the first to admit that I think of myself as a sock-and-hat knitter. I like my projects the way I... Never mind, I'm not going to finish that chestnut. Suffice it to say that I like my projects small enough that I can always keep the end in sight.
That said, I picked up two bales of wool this week; bulky natural wool in a pleasant brown. Along with that, I expanded what is apparently becoming an Addi collection. Essentially, I've committed to knitting a sweater.
As is my wont, I started by browsing the internet to determine what kind of sweater I wanted, then searching Ravelry for patterns. As usually happens, I got frustrated. Fortunately, Elizabeth Zimmerman has a pattern, described in proportions, for a warm baggy pullover. Less-fortunately, it's steeked. After more research and not a little bit of swearing, I decided to blissfully close my eyes and pay no mind to those instructions. After all, I have many many many stitches between me and slicing two holes into my knitting.
Plenty of time to chicken out and re-think the pattern as two trapezoids sewn together with the arms attached by picking up off the selvedge. Plenty of time to consider that sewing two trapezoids together will be far less solid than biting the bullet and knitting the whole thing as a tapered cylinder.
Plenty of time to knit swatches.
This is what I'm using as a swatch. This pattern, repeated over and over, is intended to make up two front panels of the sweater. The intent is to swatch it to see if it looks right and also to test texture and gauge of the wool and needles. As I'm more than mildly worried that 5mm needles (my preferred size for worsted) will simply be too tiny for bulky.
After only a little bit of discussion and plotting, I realised that the back of the sweater really deserves a different pattern from the front.

Rather than two panels of four-strand braids, the back has a single panel, centred, that makes a twelve-strand braid or knot. Fortunately, this pattern will look pleasing so long as the front panel does, so I only need to knit the one swatch as a test pattern.
In keeping with my three-project rule, I'm not to start a pair of socks or a hat or anything else until I've finished with this swatch. Further, once I've committed to the sweater, that's one of the three available slots for patterns taken up. So, likely, I'll knit the swatch, knit some socks (I have a pattern that I want to try), possibly knit some more socks (I actually have two patterns waiting for me), maybe finish a hat, and then get to the sweater, just in time for it to be too warm out for sweaters.

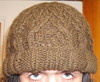
Well, after six attempts at the brim and two test-knits plus one failed attempt at the body, this hat came together.
It began as a simple concept: I wanted to make a hat that had a single braid pattern running around the brim. From that, form ollowed design. I knew that I'd have to graft the brim into a loop and pick up stitches.
That said, when starting, I noted grafting as something that I'd have to learn and had no clue what pattern I'd attach to the body of the hat. In the end, I failed at grafting but learned a lot and ended up knitting four patterns for the body before finding one that wasn't overwhelming.
The hat itself has the shift in density that I wanted, though. Around the ears, the fabric is thick, dense and warm. Atop the head, it flates out just slightly and sits loosely on my hair, hopefully preventing it from getting tangled and staticked by the hat.

Requirements
- 150-175 metres of worsted weight yarn, preferably in two colours.
- 4mm straight needles.
- 6mm circular needles and/or double-pointed needles.
- Circular or double-pointed needles in a size smaller than 4mm.
- A tapestry or sewing needle with an eye large enough to accommodate worsted weight yarn.
Instructions
Brim
Casting on
Cast on onto 4mm straight needles using a crocheted provisional cast-on of 22 stitches. Crochet a chain, placing the yarn behind a needle after every crochet stitch and pulling it through the loop on the hook such that it wraps around the needle. Chain a few more stitches and then pull the yarn through the loop. This gives a provisional cast-on that can be easily undone later on.
Knit the following pattern (brim chart):
- (wrong side) p2, k2, p6, k2, p6, k4
- (right side) p4, k4, c2l, c2r, k4, p2, k2
- p2, k2, p4, k1, p4, k1, p4, k4
- p4, c2x2l, p1, c2x2r, p1, c2x2r, p2, k2
- p2, k2, p4, k1, p4, k1, p4, k4
- p4, k4, c2r, c2l, k4, p2, k2
- p2, k2, p6, k2, p6, k4
- p4, k2, c2x2r, p2, c2x2l, k2, p2, k2
- p2, k2, p6, k2, p6, k4
- p4, k4, c2l, c2r, k4, p2, k2
- p2, k2, p4, k1, p4, k1, p4, k4
- p4, c2x2l, p1, c2x2l, p1, c2x2r, p2, k2
- p2, k2, p4, k1, p4, k1, p4, k4
- p4, k4, c2r, c2l, k4, p2, k2
- p2, k2, p6, k2, p6, k4
- p4, k2, c2x2r, p2, c2x2l, k2, p2, k2
Note here that the only difference between rows 1-8 and rows 9-16 is that on lines 4 and 12, the centre cable slants the opposite way.
Knit this pattern until, at the end of a set of 16 rows, the flat band that you are knitting is large enough to fit around the ears. Knit row 1 again. Cut the yarn, leaving a 1 metre long tail.
Grafting
Untie the knot at the end of your crochet chain and tug on the tail of yarn to undo it. As it releases stitches, pick them up on your free needle. The stitches may be slightly twisted here, so make sure before grafting that they are in the order specified by row 1 of the pattern.
Holding up the two needles, they should be facing the same way without twisting the brim. Turn them so that the brim forms a loop with the wrong side facing out.
You'll need to graft the stitches as they lie, using knit grafting (kg) for the knit stitches and purl grafting (pg) for the purls. Or, in other words, kg 4 times, pg 6 times, kg twice, pg 6 times, kg twice, pg twice.
Body
Picking up
Hold the looped brim so that the k2, p2 rib is at the top and the p4 stockingette is at the bottom. Pick up one stitch per row around the brim. Because the body is knit on larger needles, there is no need to adjust for gauge.
Knitting the body
Count the picked up stitches. If you didn't miss any rows, you should have a multiple of 16 stitches, plus one. Find the nearest multiple of 16. If it is greater than your number of stitches, you'll be increasing. If it is less than the current number of stitches, you'll need to decrease.
Mark the beginning of the round.
Using the 6 mm needles, knit one round in p2, k2 rib. If you need to increase, knit, evenly around the round, kfb, p2. If you need to decrease, knit k2tog, k1, p2 evenly spaced around the body of the hat.
Knit the following pattern:
- p2, k2, p2, k2, p2, k2, p2, k2
- p2, k2, p2, k2, p2, k2, p2, k2
- p2, c2l, c2r, p2, c2l, c2r
- p3, c2x2l, p4, c2x2r, p1
- p3, k4, p4, k4, p1
- p3, c2x2l, p4, c2x2r, p1
- p3, k4, p4, k4, p1
- p2, c2r, c2l, p2, c2r, c2l
- p2, k2, p2, k2, p2, k2, p2, k2
Do not knit the last two stitches of this round. Instead, move your round marker back two stitches. This is the new beginning of the round.
- c2l, c2r, p2, c2l, c2r, p2
- p1, c2x2r, p4, c2x2l, p3
- p1, k4, p4, k4, p3
- p1, c2x2r, p4, c2x2l, p3
- p1, k4, p4, k4, p3
These two rounds make a 4-stitch-wide twist in the columns of 4 knit stitches.
- c2r, c2l, p2, c2r, c2l, p2
Knit the first two stitches of the next round and move your round marker forward two stitches. This is the new beginning of the round.
- p2, k2, p2, k2, p2, k2, p2, k2
- p2, c2l, c2r, p2, c2l, c2r
- p3, c2x2l, p4, c2x2r, p1
- p3, k4, p4, k4, p1
- p3, c2x2l, p4, c2x2r, p1
Reducing
If you are knitting on circular needles, as you knit the following rounds, when the stitches become too tight, switch to double-pointed needles.
- p3, k2tog, k2, p4, k2, ssk, p1 (14 stitches per repeat)
- p2, s1, p1, psso, c2l, p2, c2r, p2tog (12 stitches/repeat)
- p2, s1, p1, psso, k2, p2, k2, p2tog (10 stitches/repeat)
- p3, c2l, c2r, p1
- s1, p1, psso, p2, c2x2r, p2tog (8 stitches/repeat)
- p3, k4, p1
- p3, c2x2r, p1
- p3, ssk, k2tog, p1 (6 stitches/repeat)
- s1, p1, psso, p1, k2tog, p1 (4 stitches/repeat)
- s1, p1, psso, p2tog (2 stitches/repeat)
Finishing
Cut the yarn and draw the tail through the stitches on your double-pointed needles. Pull it tight, knot it and weave it in.
The bottom of the brim is 4 rows of purl stitches and likely rolls in on itself. Taking a tapestry needle and yarn of the same colour as the brim, sew the selvedge to the uppermost row of purl stitches.
Chart
Brim

Body

Here's a nice simple hat pattern that popped into my head as I was re-knitting the knotwork hat.
Cast on enough stitches (a multiple of 4) on a circular needle to go loosely around the head. Join in the round and mark your starting point.
- Knit one round of k2, p2 rib.
- Cable two left (place two stitches on a cable needle, purl one stitch, knit two stitches off of the cable needle), purl one, repeat.
At the end of the round, move your starting point forward one stitch.
When the hat fits from ears to the top of the head, begin decreasing on the purl stitches. As before, after every cable row, move your round marker forward one stitch.
Essentially,ssk the last knit stitch of every fourth rib together with the following purl stitch. Cable the next round, then ssk on the cable before the decreased one, cable again.

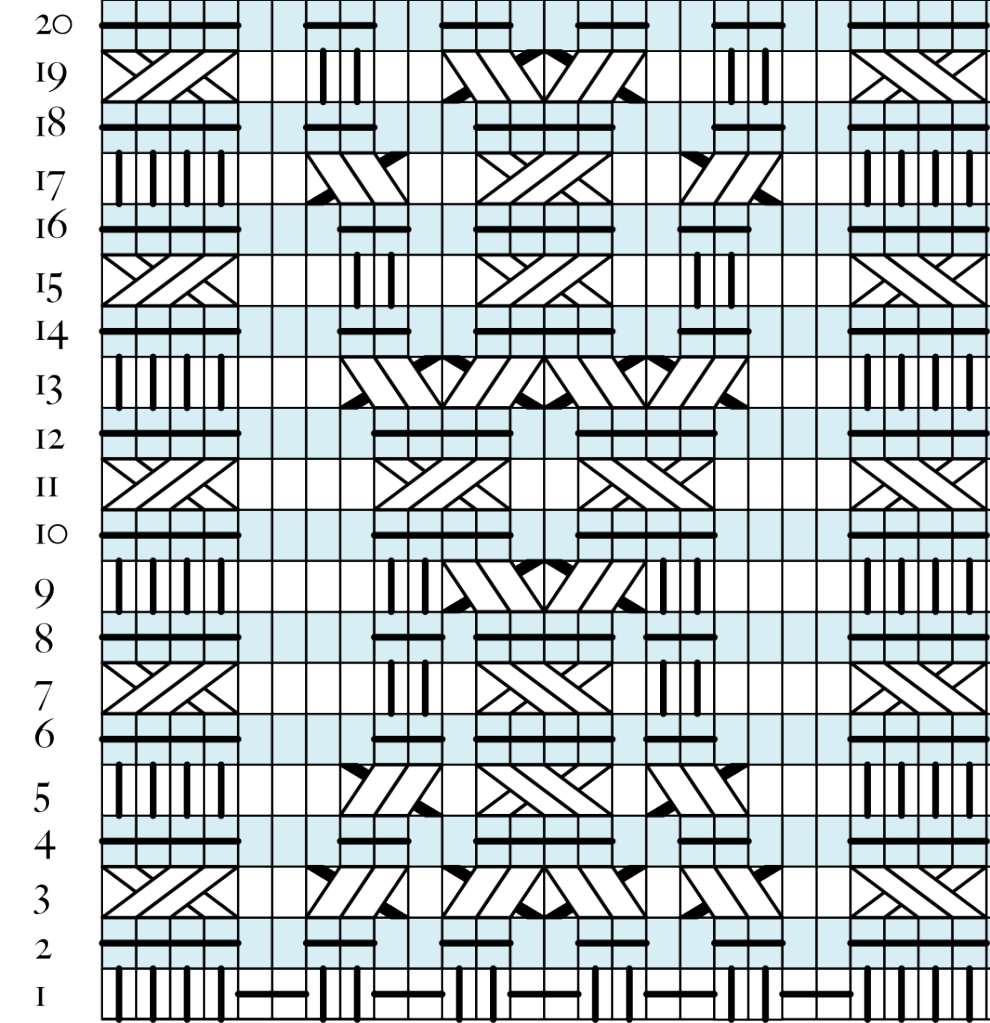
The chart shows four cables; the parts in purple are repeats of the pattern. Rounds 1 and 2 should be repeated until the hat is tall enough, as described above.
These decreases should spiral around to the middle, where they meet.
After you're done decreasing, pass the yarn through the remaining stitches and pull tight.
 I'm knitting, flat, the brim of a hat which will eventually be joined together and picked up. This is the chart that I'm following, a paired three-strand braid. The left side will be picked up and be knitted with a further knotwork pattern. The right side will be folded over and sewn together, to make a rolled border.


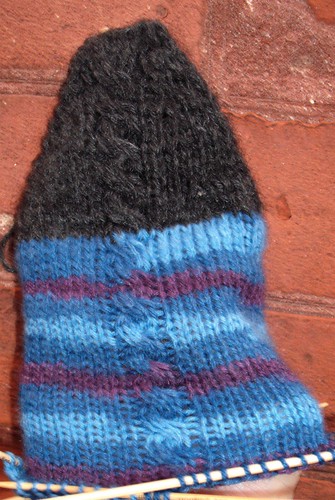
I've just finished knitting this hat, with a cable pattern of stylised trees. The trees themselves are based on a binary tree structure, but have twists and knots around themselves and around other branches. The way the branches converge into a cluster reminded me of groves of dogwood, hence the name.
The trunk expands (via a pair of decreases and increases), then splits into two branches. These branches twine once around themselves then split again, the four split branches twining before dividing yet again into a meshwork of twisting branches that stretch to the top of the hat.

This is a pattern for a hat that just popped into my head. I thought it would be neat to use cables in a spiral pattern, so that half the cables turned right and the other half turned left. As I was knitting it, I added a few more things, like the cables being woven into an over/under/over basketweave.
The hat is surprisingly soft and warm (I knit it from heavy worsted weight wool) and, because it is, in essence, a k2 p2 rib all the way around, it has a good amount of give to it.
The pattern has cabling on three rounds of every eight, but it repeats often enough that it's elatively simple to keep in your head.
Requirements:
- Double-pointed needles (I used 5mm DPNs)
- Optionally circular needles in the same gauge.
- 100 to 150 metres of worsted weight yarn.
I knit the hat with a gauge of 2 stitches / cm in k2p2 rib and 5 rounds / 2 cm, but the pattern adapts easily to different sizes by adding or removing repeats both around and vertically.
Cast on enough stitches on circular or double-pointed needles to go loosely around the head, with the number of stitches being a multiple of 8. The pattern repeats are 8 stitches long, with two cables being worked every 8 stitches.
Join in the round, then knit 2, purl 2 and mark that point as the start of your round. The pattern from here on will be expressed as a set of eight stitches. Repeat that as many times as needed to finish the round.
| Rows 1-12 | k2, p2, k2, p2 |
| Row 13 | Cable 2 left (c2l: Place two stitches on a cable needle or double-pointed needle, hold them in front of the work. Purl the third stitch then knit the two stitches off the cable needle.), cable 2 right (c2r: Place one stitch on another needle, holding it to the back of the work. Knit the next two then purl the stitch off of the cable needle), p2 |
| Row 14 | p1, cable 2x2 right (c2x2r: Place two stitches on a cable needle, holding it to the back of the work. Knit the next two then knit the stitches off of the cable needle), p3 |
| Row 15 | p1, k4, p3 |
| Row 16 | C2r, c2l, p2 |
At this point, every pair of cables has moved toward each other and crossed over, with the left cable going over the right.
| Rows 17-19 | k2, p2, k2, p2 |
| Row 20 | k2, p2, k2, p2 |
| Stop this round four stitches before the end and mark this point. There should be one column of ribbing left. For the next four rounds, this is the new beginning of the round. |
| Row 21 | c2l, c2r, p2 |
| Row 22 | p1, cable 2x2 left (c2x2l: Place two stitches on a cable needle, holding it to the front of the work. Knit the next two then knit the stitches off of the cable needle.), p3 |
| Row 23 | p1, k4, p3 |
| Row 24 | c2r, c2l, p2 |
| Row 25 | k2, p2, k2, p2 |
| At the end of this round, move the beginning of the round forward four stitches, so that it's back to where it was originally. |
| Rows 26-28 | k2, p2, k2, p2 |
| Row 29 | c2l, c2r, p2 |
| Row 30 | p1, c2x2r, p3 |
| Row 31 | p1, k4, p3 |
| Row 32 | c2r, c2l, p2 |
| Rows 33-35 | k2, p2, k2, p2 |
| Row 36 | k2, p2, k2, p2, marking 4 stitches before the end as the new beginning of the round. |
| Row 37 | c2l, c2r, p2 |
| Row 38 | p1, c2x2l, p3 |
This is where I chose to begin decreasing. If you want a deeper hat, continue the pattern, knitting rows 23-38 until the hat is as long as you want it and stopping on a row where you are either cabling 2x2 left or cabling 2x2 right.
For the decrease rows, the pattern repeats quicker and quicker as you go because the pattern is decreasing in size with every row. Row 1 repeats every 8 stitches, row 2 every 6, row 3 every 5, etc.
If you are using circular needles, when the hat becomes too tight on them, switch to double-pointed needles in the same size.
| Decrease row 1 | Slip slip knit (ssk: slip two stitches, inserting the right needle as if to knit them. Insert the left needle into the front loops of the slipped stitches, wrap the yarn around the right needle and draw it through the loops), knit two together (k2tog: insert the right needle through the front loops of the first two stitches on the left needle. Knit these stitches as if they were a single stitch), p4 |
| Decrease row 2 | SSK, p4 |
| Decrease row 3 | SSK, p3 |
| Decrease row 4 | SSK, p2 |
| Decrease row 5 | SSK, p1 |
| Decrease row 6 | SSK |
Repeat row 6 until you have fewer than ten stitches on your needles. Take the yarn and pull it through all of the remaining stitches before sliding them off the needle. Pull the yarn inside the hat and tug it tight.
|
|